
Buttons
Buttons have stories to tell – given any random button to hold in your hand and it’s highly likely that we can remember which garment it came from, even if we last saw it or wore it many years ago. The inherited button box has always been a fascination for small children, it’s a repository of memories, and for us, a great source of material for new projects. Why not take that beautiful Victorian hand paint button from it’s box and fix it to a lampshade or a curtain where it can be enjoyed daily ?
Buttons are firstly functional- they have a job to do, and then as is the nature of man, anything that stays still long enough gets decorated. So buttons have been painted and moulded, fabric covered, made from glass or ceramic, metal or wood, nuts or seeds and in all manner of sizes and shapes. And this is their joy, even when there are rows of the same for sale, we can find other buttons – on antiques stalls, those that were once made for the wealthy alongside those painted by gypsies, and then at crafts fairs new buttons, made by a local potter or ceramicist. Or we can make our own.
Buttons are secondly decorative – they create mood and atmosphere, so they are special. Throughout the fashion and furnishing worlds buttons have high presence, being carefully considered, designed and positioned to convey personality. We’ve all surely changed the buttons on a high street jacket to make it just that bit more special, unique. And so it is with furnishings – buttons alone can make the back of a thing look every bit as good as the front.
Collecting buttons from earlier garments and antiques market stalls is an enjoyable past-time that won’t break the bank; buttons can be used and enjoyed immediately, just for decoration even if you have no closure project in mind. I’ve got some really beautiful creations from a stall in the Bath antiques market–they are whole sets still in the makers’ boxes, displayed like exquisite pieces of jewellery: they weren’t given away by any means, but I love them and wish I could have stretched to a few more!
Also keep an eye out for buttons made from recycled materials such as glass and leather, paper and plastics, bottle tops and scrap metals. These buttons may not be elaborate but they are hand made and carry something of the makers hand and individuality. When we use wooden and glass beads and buttons from small African village workshops it just adds something to the work and the global spirit, when we realise, or remember, that these have their stories too. They have been formed or painted by a real person and not a machine – a mother, a boy or a girl sitting in community, under the sun of a remote village, making things that are used and enjoyed in my world, which is as remote to them as theirs is to me.
A few years ago I bought a collection of handmade buttons from a lady whose father had been a button maker to the couture world, so each of these had been made with a particular garment or designer or client in mind. They are over-runs and seconds, special and unique, and a constant source of inspiration as we imagine the type of garment, the fabric and construction that might have been the design driver.
With the internet, the button market has become global, so finding amazing and beautiful buttons and button dealers is very easy; however, if you have the time and the inclination, there’s still nothing like a good rummage through country sales or craft fairs to make your own finds.
Searching out unusual and indigenous buttons on holiday is good fun, an ancillary pastime that may even add a greater sense of purpose to an excursion. Buttons and beads are pocket buys, they’re easy to carry, useful, and a constant reminder of a great experience. You can’t ask for more than that!
And who can’t resist the lure of Murano glass beads from Venice ? Collecting a few at a time from the small shops that line the lanes radiating from St Marks square – for necklaces but also for buttons, to weight cords or to finish off the ends of ties.
Button closures
* I guess the zipper took over from the button because it’s more reliable, and certainly people don’t much like making buttonholes, as they are a bit of a fiddle. But then it’s not that easy to set a zip really well.
* For all visible openings, and especially for cushion and loose covers we always prefer to have some sort of buttoning or ties over zippers.
* Cushions especially are so much more pleasing if they’ve been designed without ugly zips; in our house–even with housekeeping help–it’s virtually impossible to assume that cushions are always placed with the zip down, or even with the front showing…And I know I’m not alone in this as I’m always turning cushions over or zip down in clients’ homes.
* I can never comprehend why loose covers are so often made with zip side closures, or even worse touch and close tape? There is nothing more ugly, especially as it’s not a given that these closures are out of sight: the backs of sofas and chairs are as likely to be in the middle of a room as against a wall. A row of buttons would look so much better- and for such a relatively low percentage of time.
Closure buttons work with rouleau loops, buttonholes , eyelets, frogs, laces and ties. With the basic skills under your belt and some design inspiration, button world is your oyster !
Placement
Once the decision to use buttons has been made the placements can be as imaginative as the function allows. For example a row of tiny buttons used as a closure will be different, but not necessarily worse than say, 2 over- sized ones.
It goes without saying that spacing and button size must relate to the complexity and proportions of the project; however all rules can be broken, and as long as they still do the work, buttons can virtually disappear, become a real feature, work in groups or series, or even have non functional buttons mixed in.
Positioning buttons
* Buttons should always be placed along the centre line of the closure allowance
* Always place the buttons onto your work before you even think about making buttonholes or placing the opposite part of the closure.
* If you want to use an oversized button, you need to allow extra width from the closure edge, rather then moving the button away from the centre line. If you chose the button late, it’s better to add a facing than move the button line.
* A neat row always looks good, however pairing and clever spacing can half the making time.
* For good proportion and balance a general rule is that large buttons should be spaced further apart than small ones.
Buttoning
In furnishing terms, ‘buttoning’ generally refers to the method of stitching through layers of horsehair to make cushion pads and chair arms and backs; the tufts, or buttons are the decoration that cover the stitches. This button covered stitching can be shallow, just enough to make an indentation in the work, or deep, creating fabric fullness between each button that is pleated away – as we can see on bed heads, chair and sofa backs and seats, mattresses, fixed seat cushions and boxed cushions used as seating.
The ‘buttons’ might be made of any material including circles of fabric or leather, or wool tufts. Buttons with shanks are often self covered so that the shape created by the stitching forms the pattern – this is usual for buttons set deeply within any material, creating a sort of soft sculpture. But it’s not compulsory and any deep buttoning can either be self covered and dense, or reflective – made of tiny metal studs, glass or crystal beads that reflect light.
When buttoning is more practical than decorative, the buttons need to work harder to create one sort of impact or another, and here your imagination can take flight. Some alternative ideas to the expected idea of buttons are beads, crystals, gaming counters, coins, coffee beans, stones–anything that’s not sharp and that you can drill a hole through.
BUTTON TYPES
Sew through:
These are the the ones we experience on every day-to-day shirts and jackets. Two, three or four holes are pierced through the centre of the button to provide a means of fixing them. As the stitches hold the button very close to the fabric these buttons are ideal for our purposes unmaking buttoned borders, for plackets and for closures, as well as for surface decoration. For ease of use however, you need to make a shank from thread that is at least as deep as the buttonhole and with enough lea-way to allow the button to turn easily as you fasten and unfasten it.
You can make the shank by eye when you have some experience, but a readily available matchstick, or tapestry needle make good spacers. Start from the right side and secure the thread, then take the thread through the button and over the matchstick or needle that is held on top of the button. Make several stitches, take the spacer out and lift the button to the extent of the thread loop. To form the shank, now wind the thread tightly around the threads beneath the button. Secure the threads by backstitching into the shank, run the thread away between the fabric, layers, secure and cut off.
If the fabrics need any extra reinforcement – a fine fabric will already have been interfaced – make a neat square of the same material beneath each button and stitch into this.
Shanks:
Shank fittings allow the button to be seen without thread interruption and so are always used for ball and domed shaped buttons; for deep buttoning the shank is used to pull the button right into the well and as close to the fabric as possible. Always look at the depth of the shank to make sure it’s suitable, however should your button of choice not be perfect and if you need the button shank to be longer, you can always extend it with cord or fine ribbon.
If the shank is too deep the button will wobble around, the back will become visible and it won’t look or sit well in its buttonhole. To limit this, line up the shank with the direction of the buttonhole and attach it using small stitches; if it’s wobbly or you want to ‘shorten’ the shank add button hole or blanket stitches all the way around; these act to decrease the shank and pull it back into the fabric.
If you’ll need to remove these buttons for washing, you can make them to be detachable. Make small eyelets in the main fabric, push the shank through and fix it at the back with a small toggle, a pin from the back of the button card, a small safety pin, or stitch a flat button to it.
Studs:
Studs are not buttons but can be used in place of, with the dual advantage that they don’t require a buttonhole to be worked and that they remain exactly where they are pinned. As well as the more obvious jacket studs and anything available from the haberdashery racks, look to the camping and yachting world for inspiration and for larger scale studs. Earings, broaches, hat pins and cufflinks are all types of stud that make fantastic alternative buttonings.
To fix studs, either pierce the fabric with the given pin and fix it to the back, or make a small eyelets to accommodate the shank and fix the back with a toggle or a security pin
Beads:
Beads are not intended to be buttons, but they can work as such extremely well– all that’s required is that you make the shank yourself. To do so, secure the thread and take it through the bead, then back into the fabric. Ease the bead away from the fabric, far enough for a shank to be created beneath the bead; allow enough length to accommodate the depth of the buttonhole or tie, plus 3 mm ( 1/8″). Wind the thread around this core a couple of times to hold the bead in position, make three-four more stitches to secure the bead, wind the thread around the length of the shank, secure with back stitches into the shank and take the thread away before cutting it.
REINFORCING
For heavy use projects with fine materials such as duvets and for denser fabrics such as denim, gabardine, or corduroy, you might feel inclined to reinforce the button stitching. Where the button back won’t be seen, you can use a small square of the main fabric, or a non fraying felt in a similar colour; place it behind the button and take all stitches right through to the back of the reinforcing square; trim it back until it is just the size needed.
Where the button back will be seen, place a small, flat button on the back and stitch this in place each time the threads come to the back. For duvets and pillows, cotton covered housekeepers buttons or simple shirt buttons work quite well as reinforcing buttons.
LINKED BUTTONS
These operate in the same way as cufflinks. In fact cufflinks of any ilk and design are a very good option for special cushion closures and lampshade details; and especially when the cushion is a gift. It’s a fun idea to make the cushion the vehicle for the gift…..the cufflinks.
To join two buttons using a stitched shank
a) run several threads between the buttons leaving the linking threads between them long enough to do the work needed, plus 3mm ( 1/8″ ) for ‘shrinkage’. Work close buttonhole or blanket stitches along the length of the link to make a good looking shank; the stitches should be very neat and dense. Run the thread through beeswax if it keeps twisting and knotting prematurely.
b) stitch a narrow ribbon between the buttons to connect them. Fold the ends of the ribbon under at both ends and stitch one button securely to each of the doubled squares of ribbon.
COVERED BUTTONS
There are kits available in several convenient sizes that make covering buttons with fabric a straightforward process. However, they aren’t without their problems and if you want a different size or prefer to do without the harsh metal or plastic teeth and shank, you could make them as they used to be made before kits were invented. The major benefit to this is that you can use fabrics that the kits don’t easily accommodate –voile, lace, velvet, fur, leather, etc.
You can make covered buttons in three similar ways: with a ring to form the shape, with a flat circle of stiffened fabric or fabric covered card, or with both the circles and the ring.
a) The ring:
Select a plastic or brass ring (use plastic only if the item will require frequent washing ) and cut a circle of fabric to just under twice the diameter. Run a gathering thread–a row of neat small running stitches–around the perimeter, as close as you can to the edge without the material fraying away. Insert the ring and pull up the gathers; secure the threads and stitch across the gap a few times to make the base for a shank. Working from the front, stitch a row of tiny, even stab stitches just inside the ring–or for a further challenge, embroider a small motif, a tiny flower, star or emblem in the centre.
b) The flat circle:
Cut a circle of firm interfacing: linen, wool melton or buckram–one that will launder without collapsing–and another of domette interlining or wool melton; cut a circle of the button fabric to just under twice the diameter. ( If you want the top to be a bit softer, perhaps slightly domed, also cut a circle of wool interlining or polyester wadding to sit closest to the face fabric. )
Run a gathering thread–a row of neat small running stitches–around the perimeter, as close as you can to the edge without the material fraying away. Insert the two circles with the softest one closest to the face fabric and pull up the gathers; secure the threads and stitch across the gap a few times to make the base for a shank. Work any stitched decoration on the front ,
c) For a button with more depth and softness, fit the ring on top of the fabric circles and make them up. image
d) To cover the back:
Cut a circle of fabric; if the face fabric is thick or in any way unsuitable, use a scrap of tightly woven linen the size of the inner diameter plus 6mm ( 1/4″). Run a gathering thread around 1/8″ from each side; pull up slightly so that the edge folds back on itself; pin to the underside of the button and secure to the first cover with tiny slipstitches.
e) To fit:
Fix it in place with a thread or ribbon shank to suit the thickness of the fabric or buttonhole.
SHOW BUTTONING
In some cases buttons are just for show. If you want to use something that looks the part but is inconvenient to use–say with rough edges that might snag, such as stones or large crystals or an uneven shape that might tear–just stitch the ‘button’ to the buttonhole, i.e. take the shank to the back and secure it. Stitch press studs just below the button and buttonhole and use these instead. The reason to still go to all the trouble of making the buttonholes is to keep it looking authentic and convincing.
THREAD
Button thread is thicker and stronger than seam stitching thread and is often doubled. A traditional tailoring technique is to draw double thread through beeswax, which prevents them from separating , kinking and knotting as you work. It’s best to use enough thread for just a couple of buttons at a time, you don’t want to risk weakening it.
Always secure the threads with a double stitch on the face, beneath the button, so that they are covered–or behind if the fabric is very fine. Don’t use knots, they’re too bulky and unreliable.
Buttonholes
Buttonholes are as useful for holding ties and ribbons, even lattice, as they are for buttons. They always look lovely en masse, especially when hand stitched, but can be a bit scary to make – they need to be exactly the right size for the button, and the stitches must be small and neat. Hand stitching looks by far the best, but takes time and some experience of handling fabrics. Machine set buttonholes make light work of the job, but are only as good as the settings given. Buttonhole thread is stronger than sewing thread and easier to manage than doubled thread.
Basic, Informal Buttonholes
Simple round buttonholes can be good options, and certainly often historically accurate – they may be found on country pieces- nightwear, smocks, flour sacks etc. And interestingly they don’t look too bad if the stitching is uneven. These are a bit ad-hoc, so to get the size right for your button and your fabric, first practice on spare piece. These buttonholes need to be flexible, so a simple blanket type stitch is used rather than the more formal buttonhole stitch with its knotted edge.
1. Mark the buttonhole positions by marking the centres of the buttons.
2. Make a hole with small scissors, a punch or awl that is approx. 2/3 the size of the finished buttonhole.
3. Secure the end of buttonhole thread into the work with a few small running stitches close to the cut edge.
4. Make a neat blanket stitch, pulling it so that the raw edge is pulled in slightly. Work neat, close stitches all the way around, and finish off with a neat double stitch and take the thread away through the stitches.
5. Steam press from the front, to embed the stitches, then from the back.
* For a more formal option, that is too inflexible for a button but perfect for tie or just decoration, make the stitches over a small brass ring.
Handstitched Formal Buttonholes
Use these for all smart work, where the buttonholes matter and especially where there is a lovely neat row, which is itself decoration. Unless you are extremely experienced the same combination of button and fabric will not have occurred before, so as these need to be neat and tidy always practice a few first.
1. Place the button onto the work, mark two ends with pins, note the centre line then take the button away.
2. Tack two rows of running stitches the length of the button, plus one thread and just about 2 mm either side of the centre line.
3. Cut the hole along the grain, centered between the threads and to the exact length of the button.
4. The buttonhole has two ends – the pulling end, the end that the button will be, when under pressure and the other, visible, end.
5. Start from the outer, or visible end.
If you’re right handed start from the lower left hand corner and make the stitches towards the right. Secure the end of the thread into the back of the work with a few running stitches between the slit and the tacked line. Bring the thread around, from right to left and under the point of the needle, then bring the needle out through the loop, so that the knot now formed will lie at the very edge of the cut.
6. Work these stitches to the end, stitch the stitches around to form a neat semi circle. Continue along the opposite side; make a bar of stitches at each end, the knotted end towards the slit.
Tip! For a fraying material: wet the slit as soon as it has been made, add a touch of pva glue (use an artists, lipstick or tiny eye-shadow brush) to the raw edges and lay a thread long the edge to use as the firm edge of the slit.
Option! For raised buttonholes lay a few threads down alongside the cut edge, hold them in place with a few cross stitches and make the buttonhole stitches over the threads, so that the finish is slightly raised.
Buttoning
Buttoning changes the character of any item – whether it’s a cushion, pelmet or a window seat pad. The extra dimensions of light, shadow, and softness are created by the indentations and changes of depth.
The purpose of buttoning is primarily to hold the filling of chair pads, window seats, mattresses, bedcovers etc. in place, and the method is as simple as a strong stitch or knotted thread. The means though, invites decoration.
* Button tufts as circles of fabric, or loops of woollen thread, are the traditional finishes and these can indeed be the best looking, however there are so many options that it is often worth investigating a few more.
* The pattern of buttoning is important – the spacing and the position – how close to the edges, how many rows, how close together are all to be decided, by marking out a template.
* The depths of the buttoning crevices will depend partly on the robustness of the materials used, how easy it is to pull the thread through and the buttons in, but also on the look that is required. Deep crevices are not so comfortable to sit on as the work creates quite a firm surface- very good for bedheads and stools, walling and screens – just not so much for sofas and chairs. The excess fabric created from the depth requires managing and is always pleated between buttons – to the row above and the one beneath, often in a diamond-shaped pattern which gives deep buttoning a distinctive look and particular decoration which can be very beautiful. Floating buttons are those that just sit, float in fact, on the surface. Pointless. And irritating. Shallow buttoning, between the two, has the means to create pattern and sculpture without the problems created by with deep buttoning – it’s enough to show the fabric off well, adding new dimensions and movement whilst remaining soft as well as showcasing the buttons.
* Self covered fabric buttons are smart and chic, the least obvious, that allow the form of the buttoning pattern to take the credit.
* Buttons can be used deliberately – to direct the eye or to create a more interesting form that the one given, to redress an imbalance.
* Add a touch of glitz and glamour by using buttons made from glass, crystals, horn or leather.
* Extra tiny buttons are as effective in their dimunitive size as over–large ones, even the tiniest crystals or small baby buttons.
* Extravagant buttons on a simple fabric such as wool melton make a bold statement.
* Hand–made and painted buttons add individuality, personality .
*Think outside the box: you can use other media to make the buttons, such as pebbles, beads, nutshells, silk roses, etc.
Buttoning
1. Find the centre of the pad at the top and the bottom and define the place with crossed pins, then stitch with coloured tacks.
2. Always make a buttoning template on calico or muslin.
To do this, cut a spare piece of calico to shape and slightly larger ( approx. 5 cms ) than the area to be buttoned. Experiment, test the spacing possibilities by marking potential button positions with crossed pins. When the design looks good, lay it over the pad to check, then when it looks good from all directions, mark each ‘ button’ clearly with pencil. To transfer the marks to the cushion, either make punched holes over the pencilled points and transfer the mark by pencil, or pin through the pencil points then transfer the marks with a second pin into the fabric beneath.
On the main fabric, mark each point securely with pencil, coloured tack or crossed pins. ( Pencil is Ok, as the mark will be completely covered by the button).
3. Mark the button positions on both the top and the bottom of the pad – it’s easy for the needle to go off course, so you’ll need the markers on both sides to keep the pattern good and reversible.
4. To make the buttoning pattern, work from the centre of the pad and always work from the same side.
5. Using a heavy duty or buttoning needle threaded with buttonhole or upholstery cord, push from the bottom through to the top marker. Leave plenty of cord free. Thread through the button or tuft and push the needle back through to within 3mm / 1/8 ” of the first hole. Thread the cord through another button, tie the ends together and pull tightly. Knot two or three times to secure.
Tip ! To button a thickly padded cushion, or to pull a stiff fabric in, wipe it with wax, then send the thread through the pad two to three times. Secure the thread ends with a spot of clear nail varnish.
Laundering
To clean buttoned pads:
a) snip the threads or cords holding the buttons in place, remove the cover and launder according to the manufacturer’s instructions.
b) stretch it back on whilst still slightly damp. Press and leave it on an airer to dry fully.
c) replace the buttons with new threads, stitching into the first stitch holes.
* If the holes have torn, look vulnerable or the fabric needs support, first add an interfacing to the back of the fabric cover; either pin in place to hold it there whilst you make the buttons or use fusible interfacing to bond to the fabric to secure a tear or worn edges.
Or replace the buttons with something of a larger diameter – perhaps wool tufts or circles.
Care and Maintenance
Careful and regular maintenance is the key to prolonging the life and maintaining the appearance of all furnishings.
External factors – your climate, water softness, linings, general use, all affect the level and quantity of care and maintenance needed, so there are few hard and fast rules. What we offer here are guidelines, encompassing experienced housekeeping knowledge, manufacturers advice and textile research results, which should be helpful.
Whether you do it yourself or not, a good and thorough clean, is therapeutic, and the traditional Spring clean routine is both sensible and very reassuring. The warmer, longer days as the seasons change enliven and energise us to put our house in good order for the summer, and for the long sociable evenings we hope to enjoy. Perhaps the higher sun spotlighting the neglected window cleaning, has something to do with it…
It’s good to know the house will be respectable for another year, even at the back of the cupboards and behind the pictures, and that all of the books have been taken out and freshened up.
To shake out the curtains and cushions, to beat the floor rugs and wash the loose covers, put away the winter bed covers, is all good. The air feels fresh, the house revived, spirits lifted. You feel ready for anything.
Textiles
A good spring breeze is the perfect remedy for textiles; furnishing fabrics in constant use take a battering from all manner of day to day soiling, which builds up over time. Airborne dust, smoke from fires or cigarettes will all blow out in a good cross draught. Washable covers and curtains dry quickly in a breeze and smell wonderful afterwards. Spring is a good time to wash out newsprint grime and marks from spillage and childrens sticky fingers.
Accidental spillage needs immediate attention. However, we need to remember that the damage is accidental and a big fuss can be embarrassing, so it’s useful to have some simple, immediate solutions to hand, even if only as a stop gap. A different matter If it’s children, or teenagers – they are probably somewhere they shouldn’t be, with coco cola, lollies or chocolate, in any case.
Traffic grime is particularly damaging and needs to be dealt with on a regular, and frequent basis. As you will quickly notice if you live in a city or close to a main road, window furnishings are deeply affected, but layers can also be deliberately employed to catch this dirt.
At the end of the day, you can’t go too far wrong if you treat your furnishings as you would treat a suit or ball gown – clean marks as soon as possible, and plan for regular cleaning and maintenance.
On a day to day level, air, and if not breeze then vacuuming, is the best preventative; it’s better not to allow grime to build up. Once dirt has penetrated the fibres it is much more difficult, if not impossible, to restore any textile to its former glory.
Our advice is: once a week, cover the end of the hand held brush attachment with a mob cap of muslin, which will protect even delicate fibres, and brush lightly over all furnishings. If this is done regularly it really doesn’t take long, as you are always only dealing with light dust. And cumulatively a lot less time than dealing with ingrained dirt.
Chairs and sofas
Cushion covers should be zipped and armcovers fitted with hooks and eyes, for ease of removal . The trick is to wash or dry clean just before it looks necessary, and long before grime becomes obvious. At that point it is ingrained, set and problematic.
Early on, every ‘spot’ shows, however there is a point at which, once the ageing process starts and fabrics begin to fade and take on a softness, a general change takes place, and mopping up the odd spot or area of wear, just shows that area up even more. Regular dry cleaning or washing are still the best solution.
The most common damage to the valances and skirts are a) shoe polish, which requires immediate cleaning with a specialist product and b) dogs, who choose to lie against the covers – frequent washing is the only solution to remove these natural oils.
Curtains
Light vacuum as for chairs – remember dust collects along the tops and spiders like the inside of the pleats at the back. Shake them well each time, and before you vacuum the floor.
Flies and spiders webs are always a nuisance and need to be discouraged before they leave black spots on everything – almost impossible to remove.
Our advice is to take advantage of any warm, breezy day. Open the windows and doors wide to create a through draught and give the curtains a good airing as they blow in the wind.
Spraying your favourite dilute linen water onto the linings keeps them smelling fresh.
Chemical cleaning, before the point when re-lining is necessary, does curtains no good, and is expensive. With a little day to day care, well made curtains will last, in situ, for decades.
All textiles are affected by humidity. The effects on fabric that spends it’s life between a warm room and the cold window can be considerable, as the main fabric, the interlining and the lining may well react to temperature change and absorb moisture in different degrees. The results show in the hems, and one of the good things about overlong curtains is the accommodation and disguise of all ‘dropping’ and temperature effect, particularly dramatic in ancient buildings, that can .
To minimise any ruckling in the seams It is very important to match the thread to the fabric – silk with silk, cotton with cotton, linen and a minimal, shallow, zig zag to relax the seams of wools, tweeds, and any open weave fabrics.
Re-Lining
If you have chosen your curtain fabric from your heart, depsite budget and invested in quality, you won’t want to replace it. Ever. We offer to re-line clients curtains every ten years or so. In fact, this month in our workrooms we have re-lined three pairs, all for different clients, all of which we made and have been hanging for around twenty five years. The cost of replacement has not been a factor; it is that the fabrics are still loved and are right for the place. Stripped and dry cleaned, with new interlining and lining they really do look as good as new.
Cities and roadside
We have noticed a very great difference between country and city curtains. The black grime from traffic gets right into the inner interlinings – even in rooms where the windows are rarely or never opened.
The very best protection we have found is from sheer under – curtains, as the fibres trap the dust and grime before it enters the room. It’s healthier for you too.
If you wash these sheers often – monthly in the city – you will be surprised at the colour of the water, and will see the difference it can make.
This is probably the only time I’ll recommend a synthetic material – but Jab international make a fine polyester which looks and feels good, it can be washed by machine and hung up damp, no creasing and no ironing!
Lampshades
Run the muslin covered brush over the surface on a weekly basis to prevent dust settling and discolouring.
Fly spots can be a nuisance and there is little that can be done about them other than regular cleaning or some sort of trimming disguise if they become a real problem but the shade still has a few years left in it. So, make a slip cover.
Fading
All fabrics do fade eventually, some colours are more prone to fading than others – pale tones especially blues and pinks always seem to go first. Especially on the floor, such as carpet directly in front of sun- filled windows
* It’s not just the curtains and window recesses which are affected by sunlight – papers and fabrics on walls adjacent or opposite are equally affected.
* Textiles dyed with vegetable dyes or home dyes are especially vulnerable and will fade long before those produced with vat dyestuffs. Vegetable dyed colours are softer and antique textiles especially need more consideration.
* Contemporary, commercially printed or dyed furnishings fabrics have all-round fastness, and good, inherent light resistance.
* Lining and interlining protects the main body of the curtain. Protecting the leading edges by drawing the curtains off the windows and away from light is rarely possible; sometimes closing them completely is the better answer.
* Lightweight sheers or Holland cloth roller blinds give proper protection and still allow you to control the extent and direction of day light.
* Shutters are another option. Slatted, colonial style shutters blinds are excellent if the room style allows; for a new build you might include pierced metal roll down blinds. If you don’t need the light especially, either solid wooden or pierced metal folding shutters work very well.
CLEANING
GUIDE TO CARE SYMBOLS
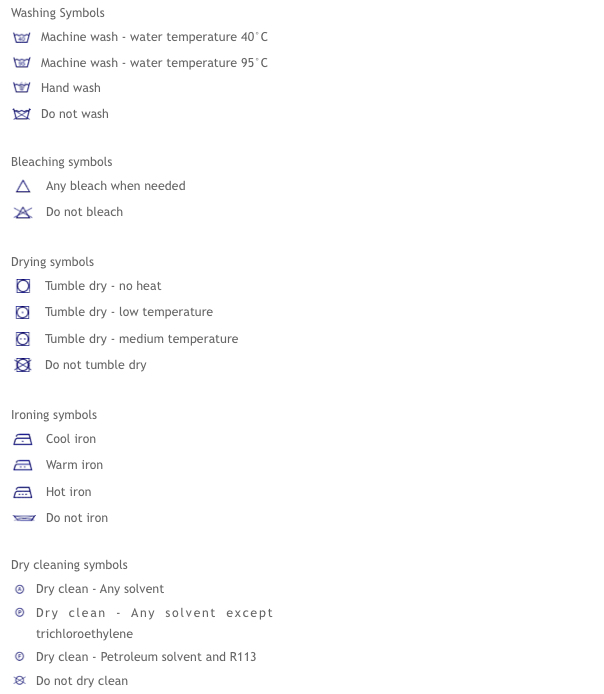
Washing
There are care symbols provided with every textile, and as these are the manufacturers directions, any other course of action becomes your responsibility.
However, It is my experience that many textiles marked for dry cleaning can be washed and we would always recommend washing all manageable items if at all possible. It’s less expensive, more immediate and often better for the fabric.
As always , the best way to know is to test. Take two 10 cm ( 4 ” ) squares, make one dirty, wash as hot as you need, and see what happens. Test for shrinkage, texture and cleanliness.
In our workrooms, it’s a matter of course, to test the fabric before cutting out. For anything fitted, like loose covers, we then either wash the whole lot, or make allowance to the cutting dimensions.
The problem with hand or machine washing is the retention of detergent, the presence of which causes fabrics to age and fade more readily. Very thorough rinsing is most important , as almost all washing powders and detergents contain some kind of bleaching or brightening agent, which can seriously affect the colours. Advice on specialist bought products needs to be current, fso or up to date advice contact the advisory service fro your fabric, listed at the end. wool, cotton , linen.
As a rile of thumb, any eco – friendly products or those suitable for baby clothes will be fine , as long as hey are strong enough to deal with the problem.
Mild liquid detergents such a stergene, woolite,
Some years ago we dropped a freshly made pot of coffee, including the grounds, onto a hand printed linen chair in the studio here. We whipped the loose cover off and machine washed it at 60o. Strong coffee is our fall back for ageing linen, so I was alsolutely prepared for disaster. Not a bit of it, no shrinkage and the cover even now looks as good as new. Co -incidentally a client took a cover in the same fabric to the dry cleaner and was very disappointed with the result.
Drying in natural air is best – outside on the line, or on a drying rack in the laundry / utility room
Fitted loose covers should be pressed and fitted whilst still slightly damp to get a good snug fit., and to stretch a fabric back into place which might have shrunk slightly.
Washing in snow really does work – the natural bleaching properties works wonders on whites. Lying whites on fresh snow is guaranteed to refresh them, as is laying whites on the newly dewed grass .
Sunlight is natures bleach – hanging whites out in the noonday sun is the age old way to keep linen fresh and sparkling white.
DRY CLEANING
All textiles come with cleaning direction – either as a separate label, or printed onto the selvedge. It its a separate label, paper or fabric sew or pin it out of sight at the back of the curtain
or underside of a chair cover.
Further advice can be obtained from:
The Association of British Launderers ,
The Dry Cleaning Information Bureau,
The Wool Secretariat
The Linen
WOOL
With proper care the natural qualities of wool can be maintained for many years.
Always press wool with a hot, dry iron over a damp fine cotton cloth, on the reverse. if you need to press the face, use the damp cloth, or another piece of the wool. Never press the face/ front without a cloth.
Making Up
If seams are pressed directly, the will mark the face, so always insert a strip of cotton or wool against the stitching line to press them onto( illustration p .. ) Some people recommend brown paper, but I find that’s bringing another material into the situation, which is less pliable and no more effective.
Wool cloth naturally ‘hangs out’ wrinkles and creases – especially useful where curtain tie backs are needed.
Wool can be steamed and pressed into shape – this property is particularly good for fitting upholstery and loose covers – careful attention and work can reduce the need for pleating and rucks can be steamed out.
A soft brush will remove and surface dirt without raising the pile. I find a damp sponge or cloth wiped over my flat weave wool stair carpets as effective, as quick and less damaging than the vacuum cleaner
If wool, covers or throws have become creased or ‘tired ‘, hang them on an airer with steam beneath or in the bathroom while you take a shower . A good tip for travelling overnight in the hotel bathroom with water left in the basin works wonders.
If wool has become wet, allow it to dry naturally, in situ if possible, with doors open and a through breeze to help.
STAIN REMOVAL
Wool is the easiest fibre to keep clean , which makes it an especially appropriate choice for flooring and upholstery.
Wool can absorb moisture up to 30% of its weight, which prevents the build up of static electricity, which in turn repels air born dirt and lint.
The natural oils provide it with the ability to repel water and stains, so most stains can be dealt with quite easily, by a spot clean on the surface, and there is a very useful short window of time in which to mop up spills before they soak in.
WASHING
Some wools are machine washable, most are hand washable, but the manufacturers instructions and a sample check are the only guarantees. Throws, cushions, bedcovers should be washed in lukewarm water with a specially formulated wool detergent , and plenty of rinses.
To dry, lay the wool onto a dry absorbent cloth, roll with the wool inside and twist gently to absorb as much water as you can.
Always dry wool flat, away from direct heat, in a ventilated space. Place the item onto a dry cloth over an airer, and carefully stretch back to shape if it shows any sign of shrinkage.
Press, and manipulate if you need to, whilst still slightly damp, over a dry cloth
IN STORAGE
The same chemistry that makes wool fibre resilient and durable, lets it breathe and shed wrinkles, also makes it attractive and susceptible to the moth.
The larvae feed on the keratin protein present only in animal fibres, where the cloth has been soiled with food stains and body oil.
Wool should always be brushed clean and properly cleaned before putting away, then packed in an airtight container. The colder the storage area the better, as long as it is also dry.
Herb sachets are essential – most of us have a few basic herb sin the garden that moths dislike- especially rosemary and lavender.
LOOSE COVERS
Loose covers can be tight fitted, loose fitted , or almost not fitted – whichever look you choose you will want your covers to look as good after cleaning as they were before. The shrinkage potential needs to be known.
As always, the best way to know is to test. Take two 10 cm ( 4″ ) squares, make one dirty, wash as hot as you need, and see what happens. Test for shrinkage, texture and cleanliness.
In our workrooms, it’s a matter of course, to test the fabric before cutting out. For anything fitted, like loose covers, we then either wash the whole lot, or make allowance to the cutting dimensions.
Washing the fabric once always shortens the time before it needs to be washed again, so that is a disadvantage.
Loose covers often last for several years before they need to be completely washed, but could be a a matter of months – a factor entirely dependent on the location and amount of use
Making up with the shrinkage allowance included will mean the covers being baggy and overlong until the first wash, so this approach is only really feasible if the covers are in a high use area and you anticipate early need – such as a playroom or kitchen / family room.
Armcovers
We make full sized arm covers; these fit right to the back of the arms to the side / back seam, tucking under the back cushions or into the arm – back junction. The inside arm extends as far as possible, tucking in to the seat / arm junction. The outside arm finishes either along the top of the valance or to the floor, as appropriate.
Discrete hooks and eyes fix the covers in place. Most armcovers aren’t washed that frequently, so we usually slip stitch the cover to the back seam , which really does render them nearly invisible.
For hard wear sofas a square that is large enough to tuck in over the seat cushions is a good plan, and sometimes one for the back as well. Or separate back covers. These can be easily taken off for washing, back on in the same day.
“SCOTCHGUARD’
There are now very good waterproof sprays which can be applied to fabrics in situ or during the manufacturing process, which are invisible and hardly alter the feel or appearance . We are used to using these on shoes and handbags, on suede coats and leather bags; to have the same for high wear areas in the home is clearly advantageous.
FABRICS
Before you even pick up the scissors, check that the fabric is – the colour and pattern that you order, the pattern repeat is close to that ordered, that it feels right and that the finish is as you expected. Roll it off and check for flaws and that the total length is as ordered.
Usually you’ll have been given a few centimetres more.
There might be hanging tags clipped into the selvedge These indicate the presence of flaws. Check that this flaw is acceptable, and that the extra fabric which you will have been sent as is adequate for your needs and you can get your cut lengths out intact. Once you’ve cut into it, you won’t be able to return it.
Always order all the fabric you need at any time; as with knitting wool, if you run out, it is almost impossible to secure the exact match again.
If it is critical that the colour you order must be the same as the sample you hold, always ask for your piece to be reserved whilst you check that a ‘ stock’ cutting from the same roll will fit your purpose,
As a matter of policy, we always confirm a stock cutting before finalising the order. At the same time we take the chance to request the lightest, or darkest of the current stock, if that is, for our use, preferable.
Pattern
Pattern repeats are rarely exactly the same throughout and good size of roll, so you may find that the lengths do not easily join , or that if they do, the hemline ‘runs out’ across several pairs of curtains.
You’ll need to go with the pattern even if this goes against the grain of the fabric. If the pattern is very far out, firstly, try to return it to the supplier.
If you need to work with it, then extra weight in the corners should pull the leading edges and the returns into line within a few weeks.
Chintz
This finish , which gives a light glaze, sheen, over the fabric surface is usually susceptible to
water damage, in which case it should only be pressed from the back, or on the front with a dry iron over a dry cloth. To remove any creases the iron will have to be very hot, so use quickly. very stubborn creases might need a little steam – test a piece first, and if the glaze does not disappear, use the least damp cloth you can beneath a hot iron. if you try to use the spray from the iron, you could well find that the glaze just disappears in spots where the water hits, which is both unattractive and irrepairable.
It can happen that a fabric has been ‘over chintzed ‘. It will crack at every crease which is hopeless as , however careful you are , in a domestic situation, you can’t avoid some light creasing as you move the fabric around. Cracked chintz doesn’t look as beautifully aged as a light chintz might, it just looks a mess.
We often stretch the cuts to bring them back into square, but that isn’t usually possible in a domestic situation.
Cutting out
It’s always exciting to start a new project – and the process of cutting out is a sort of ritual – it’s the first step – an ordered, collected process, with everything in it’s place. You need the space, tools, a clear head and time enough to concentrate.
Furnishings generally don’t require paper patterns, although for chair seats and windows seats, pelmets and lampshades, there will be templates or toiles to follow. Most are made of rectangular pieces of fabric cut to the dimensions suited to your bed, window etc. Whilst no project is ever the same the techniques generally involve straight lines, so in general our projects tend not to have patterns or cutting layouts to follow; however, our basic technique sheets supply clear planning procedures and occasional guidelines.
With a patterned fabric, pieces are very often dovetailed – cut between each other, to minimise potential wastage within the pattern repeat, e.g: pieces for loose cover skirts, pelmets or cushion gussets can be cut between each other or between curtain lengths. How this works out will inevitably be different for every project. When a cutting layout is supplied it is either to be followed rigidly, or used as guidance for fabric economy – the project notes will clarify which is which.
More than anything, great furnishings depend on precise cutting, and this is best achieved by measuring and working from the outer edges.
* Firstly, always check that the length on the roll is as the length on the delivery note , and the length you ordered.
* Check the pattern repeat is as you expected – they vary – and any variation can affect the amount of cuts and how you planned to cut the length – you might just need to adjust your hem or heading allowances, or revise the whole cutting plan.
* Plan the starting point – where the hemline will be to best suit the pattern
* Look to understand your pattern – how it repeats, matches, drops and runs – see pattern matching
* Check for nap – even if it looks non- existent, it could just be very subtle – any surface variation shows more made up than when flat
* Look to see whether it can be railroaded if you decide it might be a better to cut any projects of parts.
* Measure out each length – each cut as per your cutting plan – and mark the selvedge with pins to make sure that you have the correct amount of fabric for the project. If you – or the supplier – has made an estimating error you can often correct it at this stage.
* If flaws are tagged, watch out for these and avoid them. Check the supplier has sent enough extra allowance.
* Try to plan the cuts around simple line flaws or to incorporate them into headings and hems.
* Mark the whole roll and denote each cut with pins and then snips before you cut out
* Measure twice – or many times – cut once.
* Always use very sharp scissors
* Only cut with the fabric completely flat . The fabric must be cut on the table, smoothed out and pinned to the worktable with one selvedge along one long side of the table. The easiest way is to now sweep the ruler over the cloth to remove minor creasing and folds, press to remove any firmer creases.
* Trim the short end of the fabric straight, and at right angles to the side; follow the bottom edge of the table.
* To make sure each cutting line is straight, measure up from the bottom of the table approximately four times across the width and join the pinned markers with a pencilled line , or score across it with the point of the scissors.
* Always cut with fabric flat on the table, don’t lift it off or try to cut it without flattening it.
* Always cut with one hand resting on the fabric and positioned just in front of the scissors.
* Always mark the top and the right side, of each piece as you cut it – we use crossed pins, but a tailors tack or angled double snip – anything which is easy for you to get into the habit of doing – this practice should become automatic.
* Keep the cut lengths as flat as possible – lie them on another table, or over a bannister rail, or the curtain pole until you need them. Try not to fold your lengths at all but if you do need to fold, then always lengthwise.
* Once the seams are joined, hang the curtain or keep it flat again.
The Grain
Fabric should ideally be cut along the grain and to pattern, but sometimes the printing method – and industry tolerance – allows the pattern to move off grain. In which case, make sure that the leading edges of all pairs of curtains are exactly the same – that they match at the centres. If necessary allow the pattern to run out slightly to either side but a 2 cm run – off is the most you should tolerate.
Do not be tempted to follow the pattern and cut off the grain as the curtains will not hang straight. As you cut each piece, mark the right sides and the direction of a plain fabric just in case there is a weave variation which is not noticeable until the curtains have been made up and hung.
Flaws
Before you start cutting check through for flaws. All fabric suppliers will have tagged the selvedge to highlight any flaws, and sent some extra length, however we do often find other things we don’t like- small holes, or a slub in the weave which have either passed their test , or unnoticed. We never cut out unless we’ve first checked the whole length – and not a mistake you’ll make twice.
In a large metre-age of fabric there will certainly be flaws, however if you are prepared – knowing your cuts and what you can work around, and to spend a little bit of time – you can almost always find a way to cut around them – or at least minimise the placement.
Of course you can always return the fabric for exchange , but that can be very inconvenient, both physically and emotionally – usually if you’re at cutting out stage you really want to get going. And who is to say the next piece will be any better.
What is for sure is this – the better quality the fabric you invest in – the more you pay – the less chance of a flaw, the more chance the cloth will be on grain and beautifully printed or woven. Over the last thirty years, every single trainee, once they are allowed to work with the serious fabrics , has commented on the difference. The sound of the cloth, the sound of the scissors on the cloth, the feel of it, the way it cuts , and the general manageability. You need the best wool flannel for a Saville Row suit – you can’t make it out of a dust sheet. For curtains, you can use either – as long as you keep the possibilities and the results clearly in perspective.
USING THE PATTERNS
* Lay out all pattern pieces before you start cutting
* Pin patterns to the cloth every 7- 10 cms , all around the edges and often enough to keep them flat onto the fabric ; pin at right angles to the pattern piece and approx. 1 cm within the edges and again further back and parallel to the edges for larger pieces. Pin more often towards tricky points and diagonally at corners.
*For soft and slippery fabrics, many more pins may be needed.
* Also always cut only one layer at a time, don’t be tempted to fold fabric to cut pairs as the layers just slip against each other.
* If you’ve made a mistake and end up with a very wobbly edge and no fabric spare, pin the pattern on again – this time properly – and re-cut it within the seam allowance. Just make a note to make this piece up with smaller seam allowances.
* Make sure any grain lines are exactly on grain
* Cut single or grouped notches or snips into the seam allowance to denote important points and for later matching up. When you have two similar shapes to match – for example the backs and fronts of cushions, make random groups of notches so that each of the sides is unique.
* Treat all cut pieces with care. Only fold if necessary and then only lengthwise. Drape curtain lengths in waiting over a bannister, a bed , dining table or along the side of the worktable, fold in half and then in half again. Never fold curtaining widthwise.
* Keep all scraps – look at ‘From the Cutting Room Floor’ to see how much fun you can have with cast offs, even with frayed threads.
Dressing curtains
A client once suggested that dressing curtains- and fitting loose covers- were like fitting a ball gown or a couture frock – a really essential part of the process that can make or break the hard work thus far.
Hand headed curtains need to be dressed as soon as they are hung so that the pleats are trained to fall evenly. A little patience at this stage – you will need to be able to leave the curtains tied back for at least 48 hours and possibly up to 96 hours for a determined fabric – will ensure well behaved curtains that will always hang well, with pleats thatl fall into place each time the curtains are pulled.
Gathered curtains need some help too, especially to encourage the headings to fold back neatly between the hooks, but as they should be less formal looking we tend to pleat them up as below but to let them go after a couple of hours.
To make curtain look settled, and even less formal, we open and close them many times ( a couple of hundered ) so that the fabrics are a bit softened and slightly relaxed. Steaming them lightly beforehand also works.
1. You need to be standing as close to eye level as you can get for each process. With the curtains in the stack-back position make sure that the heading is in order, pleats forwards and the gaps folded evenly between each pleat. If the curtain hangs under a track or pole, the gaps will fold behind, if in front the gaps will be folded to the front. Some headings e.g. goblet pleats will only look their best if the gaps are folded behind.
2. Take each pleat and smooth it down through the curtain as far as you can reach to form each pleat into a fold.
3. Now standing either on the floor or lower down the step ladder, start at the leading edge and follow these pleats through to waist height. From the leading edge fold each pleat back onto the last to form even pleats. Once they look neat and well formed, tie a tape or strip of fabric loosely around the curtain to hold the pleats in place.
4. Kneeling on the floor, follow the folds through into the hem. Finger press the hem firmly.
Heavily interlined curtains need to have this fold formed very firmly, or the hem will ruckle between each fold. If the curtains are overlong, keep the pleats together and bend the curtain to one side for now. Tie another tape or strip of fabric around the curtain hems to hold the pleats in place, loosely enough not to mark the fabric, but tight enough that they do not slip down.
5. Check that the pleats are comfortable. If one or two seem twisted, adjust them. Springy fabrics may need to be re-adjusted several times, but will become easier each time, as the pleats are trained.
6. Tie another tape or strip of fabric loosely around the curtain, just below the headings, to hold them in place.
The best material tie to train the curtains is a flat tape – we’ve found that slicing up the polythene tube that we use to transport them in is our perfect solution. The cost is negligible and already factored in, with the advantage that being clear they ties themselves don’t detract from the new, beautiful, curtains. Strips of fabric or woven heading tape are the other options. Clients are usually pretty good at leaving them in, however much they want to enjoy them – and they soon learn how to put them back again if they do use them; after some hours the fabrics have ‘learnt,’ quite a lot, so it’s not that hard to do.
Hem finishes
The quality of the hem tells it’s own story. And that’s as true whether referring to the hem of a skirt, jacket, curtain or lampshade. Hem lengths ( in curtains as in skirts ) might go in and out of fashion, but creating a good, well constructed hem is all about about technique, and precision. One of my bete noires is a poorly conceived hem. From a design or a making perspective, and how it looks when lights shines through. Any bulkiness or unevenness, or mis-matching or dark colour behind always look really bad under the light- to such an extent that it can completely spoil the rest of the hard work.
So, all raw edges must be well cut and trimmed, and always be tucked right into the folds as it’s from here that any unevenness will be revealed. Take special care with blinds, short curtains and pelmets that actually hang in or just in front of the window, directly in front of broad daylight.
Where it’s appropriate, a simple applied or hand worked finish can change a plain hem, and therefore the whole project, beyond measure, elevating it to a level of importance and meaningfulness that only design input, hand work and consideration can really do. A simple linen sheer, for example, is just that – until the edges are finished with carefully spaced French knots, or several rows of hand stitching or other embroidered stitching – all white on white, subtle, but the whole thing has changed.
Standard hem
Firstly hems need to have enough weight in them to make a difference – small hems will roll; unless they will be completely hidden and the bulk is too much, all hems for sheers and unlined curtains should be double folded. So a 3 cm ( 1 1/4″ ) hem needs to have an allowance of 6 cms ( 2 1/2″ ) -i.e. to create two folds of 3 cms ( 1 /14″ ). It’s generally better to show the stitching- whether executed by machine or hand than to slip stitch, which isn’t really secure enough for furnishings over a long length.
Each project has it’s own hem explanation, especially when it varies from normal, and most are OK left with the stitching line alone showing, but sometimes a bit more detail can help and broadly these are a few basic finishing options.
Double stitched
Either stitch the hemline with a double needle or follow the first line with another one, using the machine foot as the guide.
Hand Stitched
Hand stitch the two outer edges or the whole width of the hem – with shorter or longer stitches in a single, double, triple or more rows and in matching, complementary or contrasting threads.
With tape or ribbon.
Almost any ribbon in any width can be used as long as the weights of fabric and ribbon are compatible. If the fabric is reversible, you could set the ribbon up from the hem. If not, make the bottom edge of the ribbon the hemline.
1. Press the hem allowance (usually 1.5 cms) to the front. Place the ribbon over so that it fully covers the raw edge and lies parallel to, or along, the folded edge. Pin along the centre and then across the ribbon- these pins will remain in place during the stitching.
Join the ribbon ends by folding under one end to overlap the other – handstitch the gap closed with tiny stitches if there is any gapping.
2. Top stitch or hand sew over the ribbon as close to each edge as possible. Remove the pins and press.
Shell Hemming
Shell hemming is a neat and quick finish. It’s all done by hand without pressing and can easily be done without measuring and pinning. Roll a double hem to just 0.5 – 0.7 cm ( 1/4 – 5/8″ ) and pin (rather than pressing). With matching thread, make a double stitch at right angles to the hem, finishing just on the folded edge. Slide the needle along the fold for 1.5 – 2 cm ( 5/8 – 3/4″ ) and make a small stitch on the inside to secure. Make the ‘shell’ shape by taking the thread around the hem, then pushing the needle straight through from front to back. Pull tight. Repeat and then slide the needle along the fold for 1.5 – 2 cm ( 5/8 – 3/4″ ) to the next stitch.
Embroidered hem
Many simple embroidery stitches can be used for a decorative finish to a folded hem. The basic stitches such as blanket stitch, chain stitch or a coloured thread running through a machine stitched line are all easy to do, effective finishes that don’t demand too much time.
How it works
Taking an idea and making it reality, making it happen, takes commitment.
Each project comes with the necessary information to create the photographed item, and with some suggestions of how it mitt be use or made otherwise. However, to avoid constant repetition and to keep the instructions clear, we have set out the techniques in full detail in our Basic Techniques Library. These cover everything you need to know – to do with the workroom and setting up your own space, choosing and selecting materials and the detail of procedure: why it matters, what to be rigidly particular about and what can be left to an in situ decision.
The Design and Make series presents the principles and methods of tradition, artisanship and craftsmanship with new ideas and purpose. The core principles that have been tried and tested over the past thirty years in our soft furnishings workroom and taught in our courses and workshops are always the ground, the basis for all projects and suggestions. Couture, pattern cutting, dressmaking, tailoring and upholstery skills and techniques are all referenced and well represented.
All craftsmanship relies on a set of learned methods, and there is no substitute for experience and practise. In following these age-old techniques we have learnt, honed and built skills that allow us to create and adapt with ease and confidence, to make successful projects with enthusiasm and enjoyment.
These guidelines are there for you to follow step by step if you’re a beginner, or to refer to if you’re just a bit rusty.
Design and Make Projects
All of our projects have been taken directly or indirectly from furnishings that we have made for clients.
Design
A few notes on the design shown and suggestion for the materials you can choose or use:
Materials
The materials and sizes used include, as appropriate:
- Cutting plan
- Chart for alternative sizes
- Pattern sheet than can be enlarged or adapted
- Cutting and materials list
Prepare
- Work neatly from one end of the table to the other, always fold materials that are not being worked on.
- Have all the pins, rulers, threads and needles, etc. close by and in one tray.
- Start with all of the cutting out, seaming and pressing – everything that requires a clear, flat table surface.
- Make up and prepare all of the small items and trimmings – everything that you’d like to have finished and ready to hand when you need it.
- Make all eyelets, buttonholes and embroidery details in one sitting to keep the stitching consistent – even a day between can visibly affect the end result.
- Keep the iron by your side and press at every stage. Press over the stitching line and press seams from the right side to embed the stitches.
Making up
- Work methodically and neatly. Enjoy the rhythm and order of the process and the therapy of hand stitching.
- The order of work has been carefully put together – follow the instructions and you won’t fail.
- Try to make the time to finish each stage in one session; if this is not possible, leave the work in place on a large table / somewhere you can easily come back to.
- Plan your schedule to accomplish as much as you can each time; the longer you work, the faster you’ll get and it will feel concise rather than endless.
- Make an effort with the finishing details – neatening and trimming seams and corners – this might not seem that important, but it makes a huge difference to the end result, professional finish and compliments you’ll receive.
Hanging and Fitting
Refer to the Guides and Techniques Library for fitting and hanging, dressing curtains.
- Well-made furnishings can be let down by poorly considered fitting and careless hanging, whilst paying attention to such details makes fabrics look their very best and raises less well made furnishings up a level.
How to make perfect furnishings.
Our project collection contains really good ideas for furnishings that are quick and easy, which take little work and can be made without a sewing machine. These are not by any means second rate, they’re for all of us who are short of time–after all elaborate or complicated furnishings are not necessary in every space. Some of my favourite rooms are the simplest, and require few sewing techniques.
However, if you want to make things and have little experience with textiles, it’s not a bad idea to embark on a short course in any of the skills mentioned below, in order to gain the experience and knowledge that will add more strings to your bow. Whatever your previous skills, choose something that is within your capacity, yet with some aspect that which will stretch you a bit further.
My list of guidelines for making perfect furnishings is:
* Make up the most simple and least expensive fabric well and it’ll look a million dollars. Make up a great fabric carelessly and it’ll look like a dish rag.
* Never compromise on the quality of the fabric or any of the supporting materials.
* If you have little or no budget: buy good quality ends of rolls, remnants, off-cuts and old pattern books to make patchwork. Use blankets and sheeting, towels and even dust sheets for curtains and covers. Re-use torn sheets for cushions and pillows and adapt old curtains with imagination and edgings. Find denim, ticking, calico and gingham, all of which cost a few pounds a metre and dig out your odd balls of wool–or buy them for next to nothing and knit something.
* A little of a quality piece, whether new or an antique, goes a long way: buy one great piece and use sheeting or something simple for the rest .
* Make sure the design of a lampshade, chair cover or curtain compliments the surrounding space.
* A fabulous pictorial design should be seen, when the fabric will be gathering, as it will loose its glory and effect: instead use it flat and sparingly.
* Fabrics for a purpose, that enhance; make sure that they drape, or fold, or pleat or gather as they ought.
* All materials used together are fully compatible.
* Always make a test piece so that you know your materials i.e. how they reacts to steam, damp, washing.
* For anything new or unproven always make a toile – a fabric pattern, from muslin or calico to determine and confirm the exact shaping, size, and making method.
* Pay proper care to the fittings–for 99% of projects keep them as simple as possible, you’ll know when you need to push the boat out!
* Use the right size and type of needle and thread, and change the needle frequently.
* Use sharp scissors.
* Press at every stage and keep the iron always at your elbow.
* Measure everything– and keep measuring.
* Headings and any detailed finishes must be in proper proportion to the given space and to the other objects in the room.
* Every detail should be conceived with due care and consideration to the fabric and to its environment.
* All lines should be even and equal, especially those of bindings and borders.
* All edges should lie smoothly, shouldn’t ruckle, or drop at any point in time.
* With the right under-linings, interlinings, stitching and the right pressing techniques, hems and edge works should be invisible.
* Techniques such as pleating, making tucks and buttonholes must be made with precision, or not at all……
* All decorative finishes including embroidery, and beading, should be done with a confident, free mind; within a framework but with artistry and emotion.
Again!
If you want to make something well and to make it special, you need to be prepared to spend some time on both the design and the execution, to learn some new skills and to persevere with the difficult bits. Practice does make perfect: good materials and tools and a dedicated space also helps.
Dressmaking and tailoring skills undoubtedly provide invaluable help with areas of basic knowledge and an ability to handle layers of material–with knowing how it should feel. However rudimentary, a knowledge of pattern cutting, adapting, draping and design are also helpful.
Furnishings require the same skills, but they are often used in a different way and over longer lengths. As furnishings can be heavy, hems and seam allowances are made and finished differently; finishes such as piping, which are rarely used in dressmaking are one of the staple techniques of furnishings, as are binding, pleating and gathering: ties, buttons, buttonholes and eyelets are used in favour of zippers. Tailoring techniques are particularly helpful in fitting fabric to a form or substructure.
When I transitioned from couture to the straighter lines of soft furnishings I had a good working knowledge of the above skills, so was able to produce perfectly ‘good enough’ work. What made all the difference was my experience working in the West Country–farming territory– where things were originally bought and made to last. It was in the taking down, replacing, repairing and undoing of furnishings that had been made by the top London houses many years before, and which were literally shredding to pieces, that we really learnt how ‘to do it’. We stretched our horizons and learnt by trial and error–we’ve made all the mistakes and tested many ideas and methods to achieve our current highest calibre work.
Upholstery skills can help to a certain extent, however upholstery fabrics are treated and worked in such a different way, being pulled and stretched into place, that it can sometimes be a hindrance. With loose furnishings there is no hiding place; every nip and tuck, dart and pleat has to be worked into a flat piece of cloth: puckering can’t be stretched out or corners pleated and fixed to another surface.
Have Fun !
Heather
Interlinings
CHOOSING INTERLININGS
Interlinings are in effect under-linings as they are made up with the main fabric as one when the work is small enough, or attached after seaming when the area is large, such as with full-length curtains. The primary purpose of interlining is to add enough body to make the top fabric lovely and thick, padded and luxurious; the weight of the interlining defines the look and affects the drape. In addition, thick curtains block light and draughts, and work well on uneven stone and wood floors. They enclose and envelop.
Most furnishing interlinings are woven from either cotton or synthetic fibres (sarille) and are available white or unbleached, in light, medium and heavy weights. Sarille of any weight holds well to most top fabric and takes about half the time to make up than its cotton counterpart: all in all, working with sarille is a less bulky and easier to manage process. Cotton interlinings are heavier and a bit more onerous to work with, but give a more convincing and traditional finish.
Other interlinings, such as polyester wadding, very fine foam or wool felt can be used for curtaining and pelmets, but are mostly used for flatter works such as quilting, to support appliqué and make padded upholstery.
* All interlinings can be used as quilting mediums; although perhaps too heavy for bedcovers, they are good for quilted upholstery sections and flat panelled bed valances.
* The fine lightweight cotton interlining called domette just adds depth and a lovely roundness to lightweight top fabrics; use for heavily gathered and draped furnishings, pelmets, swags and tails and bed valances to add body, and as a quilting medium.
* Domette interlined curtains remain light enough that they can still be swagged up and draped, which is especially good for Italian stringing and tie backs.
* The heavier cotton interlinings are called bump and work with even the heaviest of textiles to make really weighty curtains.
* Heavily interlined curtains look good sitting well onto the floor, and in doing so cover up a multitude of floor and draughty window problems.
* Consider how you plan to launder or clean the furnishings, as the three layers of top fabric, interlining and lining all need to react the same when laundered.
* Interlining for short curtains should be of the finer and lighter weights so that the hems don’t become too bulky and still sit well without the floor to help.
* Interlining Roman blinds makes them into more solid looking, padded draught-proofers.
* Interlining wrapped over foam, rubberised hair or traditional horsehair upholstery add a layer of softness without looking over-padded. Use for window seats, settle cushions, headboards, squab cushions, upholstered stools, screens, chair seats and backs.
* White interlining is the best for all light ground and white fabrics, otherwise and for most uses unbleached interlining is fine.
PREPARING INTERLININGS
Using curtain makers interlinings, but in fact anything thick can be used – from old blankets, old wool curtains to oven glove lining, to duvets.
Cutting Out
** Interlining should be cut out following the grain – if at all possible. Failing that, lie it on the table with the top on one short side and one selvedge against the long edge, smooth it out , and cut the hem along or parallel to the other sort edge.
** Always snip the seam allowance at an angle every 5-6 cm ( 2 – 2 1/2″ ) along each edge, with cuts of just about 1.2 cms ( 1/2′ ) – you can feel the slightly tight selvedge beneath the fluffy finish. This will stop the edges pulling as they undoubtedly will as the main body drops s a little under its own weight, and as it acclimatizes.
Joining
Any machined interlining joins need to be stitched with a half – one zig zag stitch. Interlining, and all the fabrics involved will drop or adjust themselves, and this little lea-way in the stitch allows the seams to move just enough that you won’t see the layers pulling against each other in a couple of years.
Railroading
Interlining seams are best avoided if at all possible, for all small items, and so for bedvalances, short-enough curtains and blinds, pelmets, bolster covers and quilting projects we cut down the length. This tends to be not only the easiest, but often the most economical, and always so in terms of your time.
Curtains
Heavy interlinings, medium interlinings and ‘bump’ for curtains should be hand joined in the making. It takes no longer, can be easier to manage, and is far more accurate – it’s no fun trying to machine stitch big heavy interlinings – it’s hot and bulky, and the seam allowance will almost undoubtedly slip.
It is very important that all interlining seams match the curtain seams, so the widths might need to be adjusted, which again is easier to assess accurately, on the table, as you are making.
Synthetic interlinings, conversely, are generally easier to manage and may be joined before use – either with well pressed or with overlapping seams.
Walling
For walling,the seam do need to be pre-joined, in sections by wall. In which case we use flat seams with a 4 cms ( 1 1/2″ ) allowance which reduces the likelihood of the interlining causing a ridge in the walling. Either machine stitch either side of this overlap with a loose stitch or zig- zag, or handsew – press, then herringbone or long stitch either side of the seam. the overlap.
Or for the very best job, the seam can be overlapped as with curtains and stitched in situ with long stitch- secure the top and bottom with temporary tacks, sew the seams, then fully upholster. With walling, the top to bottom needs to be taut, but the side to side doesn’t have to be under so much tension.
Pelmets and Bed valances
We do occasionally machine stitch either domette or sarille for short lengths – always with an overlapping seam, zig zag stitch and snips as mentioned above. This would always be for a specific purpose or in extremis – usually we railroad, or we would hand stitch .
Bed covers
Always hand seam, use sarille or domette and overlap the selvedges.
Stitching in
If interlining is not stitched into the curtain exactly square it will fall down into the hemline in a relatively short period of time. Using the grain line – or at least the cut line along the hems – and then also checking that it lies parallel to the heading will help you to keep it square and prevent this common problem.
Linings
Choosing the Lining
The first thing to say is: never compromise on the quality of the lining. You want it to last for as long as possible and a few pounds a metre saved here is never good economy.
* Cotton sateen, the lining that is generally for sale in stores, is perfectly good but there are, as always, levels of quality. You don’t want the cheap ones – choose the best quality there is and make sure it feels substantial in the hand and is sun and moth resistant. However, many other fabrics can be used, so the choice is determined as much by where the curtain is to be hung, who will see it and what the outlook is.
* Linings always deserve equal consideration to the main fabric- even if you elect to go for the plain cream or white sateen, it should be a considered option, not a given.
* I like to see the leading edges of curtains looking more interesting when they are turned out, or drawn, or you walk past the window and catch sight of the edge – interesting but subtle.
* We generally use either ticking stripes of some sort or another, or a coloured sateen – each costing a few pounds a metre more that even the best lining, but very worth it and such a very small percentage of the whole.
* Sometimes we use small prints or weaves, and where there are window seats or deep recess, or the curtain sits between two lining areas, the lining really is the second face of the curtain.
* To keep the costs down, and still ensure decent quality we have used large cotton bed sheets – supermarket or department store quality can be fine; and we’ve used gingham, denim, silk dupion, silk noil, printed spots, shirt stripes, cotton lawn and hand painted calico, none of which cost any more than the better quality sateen curtain linings.
Finishes
We almost always add a neat piped edge to the leading edges and the hem – a tiny 0 or 00 cord, which finishes the edge beautifully. We machine the piping cord to the lining and then stitch the lining in place ‘invisibly’ with stitches between the piping cord and the lining. For a special bedroom, bathroom or boudoir, we might stitch a couple of rows of beads – anything that delights the eye and the senses, and provides an unexpected treat.
Cutting Out
* Lining should be cut out following the grain – if at all possible. Failing that, lie it on the table with the top on one short side and one selvedge against the long edge, smooth it out , and cut the hem along or parallel to the other sort edge. With lapped or folded rolls it can be easy to cut slightly off straight.
* As a matter of course, we always add an extra 5 cm ( 2”) to the lining cuts.
* Snip the seam allowance at an angle every 5-6 cm ( 2- 2 1/2” ) along each edge, with cuts just slightly less deep than the selvedge. You can feel the slightly tight edge and you’ll know by the feel of it just how much snipping is needed for it to lie easily, and this should be enough to allow the fabric to settle down over the next few months without pulling at the sides and seams.
Joining
* Join lining widths with flat seams. If your curtains have half widths, it is easier to join the full widths first and then cut the centre width through the middle. This also avoids the potential pitfall ( we’ve all done it ! ) of making up two left or right curtain linings rather than a pair.
* If there is any chance that the lining seam will be seen through the main fabric, trim the selvedges off so that the snipped edge is tidied up.
* If there are more than two widths of fabric in the curtain, it is important to make sure that the lining width is the same as the curtain, i.e. so that the seams lie together, if there is any chance that light will highlight the mechanics – the seaming, the selvedge writing etc…To accommodate a wider lining, either trim the lining down, or make an extra wide seam in the curtain widths.
* As this is not always straight forward, as fabrics vary in width quite considerably; pattern matching might preclude; the lining only available in narrow width…. and so on, take each project on it’s merit and decide accordingly.
Railroading
Lining seams are best avoided if at all possible, and so for bedvalances, short-enough curtains and blinds, pelmets, bolster covers, quilting projects we always try to cut down the length. This tends to be not only the easiest, but often the most economical, and always so in terms of your time. Of course a patterned fabrics will need to be joined across the width as usual.
Preparing: Hems
To make up the hems in advance, place one lining onto the worktable, wrong side up, with one selvedge exactly along the edge of the table. It is unlikely that the cut line will be exactly straight, so press up approx. 12 cms ( 5”) along the lower edge and keep the folded line parallel to the bottom of the table.
1. Trim the hemline 10 cms (4” ) from this folded line – measure exactly.
2. Fold in half to make a 5 cm (2” ) double hem. Tuck the raw edges right into the fold.
3. Pin parallel to the fold line and about half way up at approx. 30 cm intervals. Pin at right angles, close to the fold line at 5-10 cm ( 2-4”) intervals.
4. Machine stitch close to the fold line, or slipstitch by hand.
Making marks
Marking the pieces of all and any fabrics carefully and diligently makes making up so much more easy and a much better result. Understanding the importance of markings, especially if you’re not already a dress-maker, will help you enormously.
* I’m all for giving yourself all the help you can get and accurate cutting and marking up are at the very top of this list.
* Markers are continuous reference points leading you from start to finish through cutting out, pinning, matching, fitting, stitching and finishing detail.
* To find a simple method of noting the top and bottom, the right side and the wrong side of each piece as you cut it, is quite high on the list of the most sensible things to learn…..
* Get the habit : when you realise that marking has become an automatic process, you’re well on your way to being a professional!
Markings are needed to:
transfer from a pattern, to identify measured points and lines, and stitching runs to fitted pieces that will be taken apart before being re-assembled.
- Transfer marking from paper pattern or template.
When there is a specific pattern to follow, the marks and notations will be provided and will show – the easement areas, darts and matching points – with markers that need to be transferred to the main fabrics.
- Identify measured points and lines.
Most cut pieces for furnishings are to measurement rather than pattern that depend on local specifics- i.e the size of your window, or your chair or bed or cushion pad..
They are simple geometric shapes of squares and rectangles, that are cut to specific dimensions.
- Indentify for re-assembly.
For upholstery, lamp-shades and loose covers, the top fabric is fitted to a particular form so that there are no actual patterns, just the one you are making.
The pieces are cut and fitted with the right side out; once the pattern is made, the whole work is taken apart then re-assembled to stitch from the wrong side.
Each of these pieces must be carefully marked so that a) the right piece is put back to the right piece, but also so that all easements, seams and junctions are carefully documented.
* All marks should be made as soon as the pieces have been cut or fitted. and once they are still pinned together on the form.
* All markings–snips,notches and fitted or draped forms, where the front is the key, all markings should be made to be visible on both sides, so – scissor cuts and coloured tacks .
Tools and Techniques
The tools and techniques for making and transferring markings are: pins, scoring, snipping, notching, tacking- in runs, tailors, tacks or coloured tacks, pen and pencil marks, tailors chalk, tracing paper and wheel.
Pins
To mark a measured point securely with pins, either insert crossed pins with the overlap directly above the mark you want to record, or run the pin through the cloth twice so that it hold itself in place.
Scoring
The quickest and least expensive technique, solely requiring cutting out scissors. This is useful especially to create stitching lines to follow, but only works when the fabric will a) respond to the scoring and b) retain the mark long enough for you to follow it, pin it in, or take the fabric from one place to another.
Snips
With the very tip of your scissors snip into the seam allowance–about half way and at a sharp angle to distinguish it easily from any other easement snips.
Make them at random distances and in random numbers.
Notches
These are V shapes that on pattern tend to point away from the seam allowance, but in furnishing you snip them into the seam allowance, similar to snips but cut in a definite V. For complex projects and along long lengths, a combination of V notches and snips is helpful for re-assembling.
Tacks
Use cotton thread for most work, silk for all delicate fabrics and those with pile to avoid any imprint. Don’t knot the ends as these can get caught in the stitching, instead double stitch both ends.
Use colour to your advantage–keep three needles threaded up with very different colours and vary them along the lengths or at different sides to help you further. Just bear in mind that pairs–the two sides of each marked point should be the same colour.
Running tacks / transfer tacks
A straight line with a long needle so that stitches can be 2-3 cm apart, secure both ends and always stitch just below the stitching line so that the threads don’t get caught in the machine and so that you can pull them out with ease after the stitching is done.
To transfer the marks from a top layer or a pattern, pin through to the under layer at regular intervals, then fold the paper or roll the top layer back and replace each pin with another through the lower layer only. Roll the top layer away and tack along the new pinned line.
Where indicated, use this tacking line transfer method to mark the grain line, and to mark the centre of a piece or the horizontal and vertical lines.
Uneven tacks: a long stitch at the top and a short stitch beneath. These are used for marking up, thread tracing and for attaching interfacing and underlining. Also for holding the seams together when they’re not under strain.
Diagonal tacks: This tacking is used to hold interfacings in place whilst it is being stitched; and to hold layers together while they are being fitted and tested for drape, length, etc.
Slip tacking: Use for matching pattern and pattern sections. It’s the stitch that runs through two folded edges, (as in) fitting the intricate areas of loose cover or through one folded edge to a flat piece for pattern matching on the flat.
Machine tacking: This is the longest stitch possible that is used top hold layers together; and we only really use this for stay stitching. It’s much more time consuming than hand tacking and runs the risk that the top and bottom layers will slip during- (and as early as- ) the tacking process.
Coloured tacks: single tacks formed like a tailor’s tack that just penetrate one layer of fabric, to mark the point on either side of it i.e. separately on both pieces of fabric.
Tailor‘s tacks:
Use on every and any fabric, but especially light and delicate fabrics that might be damaged by some of the other marking techniques, and those that have a depth or a spongy finish (such as velvets), and those with open weaves and other deep piles.
The stitch is the same whether used for single or double thicknesses, and can be used to mark a single spot or a stitching row.
Stitch through one or both layers, and through the paper pattern as well if there is one. Leave the ends long and make a single small stitch leaving a 2 cm loop, then make another in the same place leaving another loop the same size. For a single marker, leave the ends long and snip the threads. For a row of markings, make the next stitch approx 3 cm from the last, leaving the thread in a loop between stitches.
Clip the centre of each loop. For double layers ease the two fabric layers apart until the stitch loops are lying on the top fabric, snip the threads halfway between the layers: the loops hold the stitches to each side and the long threads help prevent them slipping out.
For a single layer the loops will be on the wrong side and the ends on the right side.
* For a true tailor’s tack the first stitch is not made into a loop, it is pulled tight. All loops are cut before the layers are separated and the centre threads cut–we’ve found that the tufted layer pulls out too easily for furnishing work.
Pens and pencils
Use a soft pencil that can be rubbed out either with your fingers, a damp cloth or a rubber.
Vanishing pens always seem like a good idea and we did buy one once, but very often it’s what you are used to that works best for you–and all the other methods worked just as well if not better for us.
Tailors chalk
The tailor’s pencil. It works well on flannel, tweed and all smooth woven cloths that don’t need to be moved far or folded up. It is better for smaller items that can be kept flat otherwise you can accidentally ‘rub out’ the line. Always use a sharp corner and run it along the side of ruler, or for an organic shape by architect’s curve or eye.
If the fabric will hold the chalk line, then use it, if not then trace tack instead.
Thread Tracing
This is a couture technique to ensure that the pieces are cut and stitched on grain. It’s also essential for the best results in high quality furnishings. All designs have been considered with the straight of grain in a particular way, mostly with the grain on the straight and vertical, as that is the way the weaver has specified the yarns. But the grain may also be horizontal, is often on the bias, and occasionally half way between.
The pattern or written directions always show the straight of grain whenever a fabric is used less than across the entire width.
In making loose covers, slip covers or upholstery you need to know that the centre line is exactly on grain when you match the centre line of the cloth to a chair back, side or arm, bed-head or screen.
With a single thread there is no need to finish the ends as you want as little imprint as possible in the cloth and you want it to pull out easily. Trace the straight of grain through the vertical centre of your piece, and then across the horizontal. This horizontal line is especially useful to confirm the right angle to stripes, and when matching pattern at the sides of the backs and arms of loose covers and upholstery.
Transfer paper
This method is quite old fashioned, but still used for transferring paper pattern directions for the most complex stages, where the markings are needed within the body of the work. The marks need to be on the wrong side of the top fabric or the wrong side of the under-lining. Transfer papers work only with tightly woven or smooth surfaced materials; the paper has a surface that acts like carbon paper and it lies against the wrong side of the fabric as the marks are transferred from the pattern by pressure–for example from a needle or a tracing wheel.
The papers are available in white, yellow, red or blue. Use the colour closest to your fabric, as it may not wash out, or find one of the papers that is guaranteed to wash out.
Place the paper onto the worktable, right side up, with the fabric placed over, also right side up. Pin the pattern on and use a ruler to transfer the straight lines, a thick needle or a cross for the spots, and signify the end of seam or dart line with a spot or a short line.
CUTTING OUT
Cutting straight lines without help is a tall order even for the most experienced. Setting a pin at the end of measured marks is the first process, and for the professional, cutting accurately between the pinned marks is possible but still not really advisable on anything other than the best tempered fabric.
When you need to cut a series of lengths, often narrow widths for piping, bindings, borders, frills etc., a proper marked line saves a lot of time and angst.
One or more of these methods will suit your project and fabric.
To join the pinned and measured marks, hold the metre rule just below the pinned line and either:
- a) Score the line along the rule with the point of your scissors and follow the indentation of the scored line.
- b) If the fabric will hold tailor’s chalk, draw the line with it–always work with a sharp point and be careful not to move the fabric around too much between marking and stitching, or you can accidentally ‘rub out’ the line.
- c) Make a pencilled line with a soft pencil. All cutting lines are at the very edge of the seam allowance and will be hidden during the making process–see note below *
- d) Tack a row of stitches 2-3 cm long, just beneath the stitching line, so that they can be pulled out easily once the stitching is complete.
*With light coloured fabrics such as silk there is a possibility that a pencilled line will show through, or at least give the impression of slight dirty edge, even from within; to avoid this, measure slightly over the size and cut within the line.
* Pencil marks can often be rubbed out if necessary
MAKING AND MATCHING
At it’s most basic, marking serves simply to distinguish the top and the bottom of the back and front of a scatter cushion as you cut the pieces out. This might seem a waste of time, if you can see the pattern and you know the pile direction–but the one time you come across a hidden nap or you slip up because you just weren’t concentrating, you’ll really appreciate how marking up has become second nature.
* Mark to match and then to stitch
* Never underestimate the point of marking both pieces: make it a rule until you have unconsciously developed a marking habit.
* Don’t skimp on this process–if you’re in that much of a hurry you’re almost bound to make a silly mistake, at some stage in any case…
This comes under my grandmother’s mantra of “more haste less speed”–something you’re not remotely interested in as a child but makes perfect sense later on!
* Over a long length think about the marks so that matching them becomes like doing up a row of buttons; equidistant and it’s easy to slip one, random distances between marks are more sure. Making random and varied marks also helps.
* To distinguish between equal lengths, such as the sides of a square cushion, always mark randomly – one, two, three snips or tacks – so that there is no danger of matching the wrong sides together.
* Always mark up from the same first ‘master’ piece. Place the non-marked piece exactly beneath, pin them together and transfer all marks accurately.
* When you need rights and lefts, say for shaped seat cushions, keep count. And always double check part way through how many rights and lefts you have marked up.
* For fitted forms, especially at a difficult junction, mark each piece, bearing in mind that you’ll have very little reference to go on [later] when you are faced with the pieces on the table. With loose covers there are often three, four or more pieces meeting at a given point, so to avoid later confusion these need to be marked with different coloured tacks. Mark those that need to be joined first with one colour, and so on.
TRANSFERRING
The easiest way to transfer a mark from one piece to another within the work is with pins. Pin through from one side to the other, lift up the under layer and pin another pin through at the point of the first pin.
* Mark these points individually and securely with crossed pins, pencil spots or coloured tacks.
* Always make pencil marks on the wrong side, unless you’re sure they’ll be covered or cut out, (by a button, say )or removed as in the centre of an eyelet or stud.
Pattern matching
Part of the skill and practice of textile design is to ensure that all patterns repeat, and match, in such a way that they can be used well in reality – whether that reality is large, such as walling, curtains, sofa covers, and bed hangings, or small, for pelmets, cushions, bed valances, tablecloths, small windows. From the makers’ side, knowing your fabric – understanding the pattern fully before you even begin to pick up the scissors is important – and getting into habit of doing so, even greater if you intend to make more than a single pair of curtains.
Working with, and being able to manipulate pattern, because we knew it, has got out us out of many a tight squeeze over the years – and might well get you out of trouble if you’ve a) made a cutting mistake, b) underestimated in ordering, c) plans have changed, or d) you need to cut around flaws. If you can organise the cutting efficiently at the planning stage, it very often helps to keep costs down – as say, pelmets and cushions planned between the curtain lengths, managing half drops, or alternating the cuts for two windows.
Clever cutting can save hundreds, even thousands of pounds when the fabric is expensive, and when a long repeat and large sofas or windows are involved.
* A useful large -scale pattern will either contain, or be built up of, a number of smaller elements which allow it to work as well in smaller scale.
* All prints are planned to match at the seams – either across the width or as a half drop.
* Motifs or core prints are placed either in the centre of the cloth, central to each half, or both.
* Occasionally there will be a print which is not central and is awkward. It’s usually a great design – so work with it.
* Always remember that in the completed project the design will show more than the seams – especially if they are ( or I should say – as they will be ) beautifully matched.
* Hand printed fabrics may well not match, exactly – consider this part of the charm and do your best. An expensive print has more chance – the blocks, the cloth, the printer, will all be of best quality, whereas fairly primitive work is often printed by two people – one on each side, and whilst these rarely match and there may be compromises, won’t have broken the budget either.
* If you are hand painting your own – or have commissioned a work – always join the widths and sections first.
* Always choose the bottom of a pattern, or close to it, for the hem, making sure that the heading looks reasonable too. If you then have half a bird, or a persons head chopped off, or other unsuitable happening, then make the appropriate adjustments at the hem, until both top and bottom edges work.
* A pattern always looks best with the ‘weight’ of it along the hem – so , whilst bearing in mind the point above, there are times when the hem looks better placed within the pattern – usually just below the weightiest/ most dense area.
* In a room with varying windows, once the main window has been planned, always match the rest from the same point – at eye level or around 1.50 m ( 60″ ) and work up or down from there.
* If you are using a primitive pattern or weave with no hope of matching the repeats, always start at one place – eye level fro curtains – and work away from the given point.
* Run through these questions, and note the appropriate dimensions:
– Where do the seams match and how?
– Is the pattern a half drop or full drop repeat?
– Is there a repeat within a repeat?
– Sometimes what looks like a repeat is half of one – is it ? Some small, subtle difference in the motifs can cause trouble later on if you haven’t noticed them – or help you out if the difference is minimal.
– Does the pattern repeat more than once across the width?
– Is there a central motif?
– Does the pattern repeat itself at a different level within the pattern?
– Is there anywhere else within the width that a selvedge could match and join if it needed to?
– What happens if the pattern is railroaded – for gussets, borders, bindings, pipings etc?
There are several ways to match pattern – printed or woven – and the level of difficulty is directly related to the complexity of the pattern, the slip of the fabric, or the weave – printed satin or velvet being the worst nightmares.
Our take on it all, is that pins work, tacking doesn’t: the more pins the better the join.
Weaves
* Woven motifs and prints – self or multicoloured jacquard and damasks, should be joined as for ‘prints’ below.
* For other weaves, such as herringbone, dobby, houndstooth check, hopsack, line checks, gingham and basket weave, just notice how the weave is – whether it repeats over several or more rows; if it looks as if there is no repeat, there may not be, but always double check before you cut.
* Choose which particular lines you want to match – there are almost always some more dominant, or prominent, than others
Match the pattern.
1. Place one of the cuts of fabric right side up onto the worktable with the selvedge facing you. Place the next cut over the first, right side down. Fold over the selvedge approx 2.5 cm ( 1″ ) or where you think it should be matched – it doesn’t matter if the seam width varies each side, as you will trim them back. Press lightly.
2. Pin across the fold into your chosen line – the top of a check or into the weave, checking that the pin underneath is placed exactly as the pin at the top. A slanting pin will cause the fabric to slip, and the pattern to run off, before you’ve even started stitching. Pin every one of your chosen lines that appears along the length, and then work back through, picking other relevant lines and pinning them as securely. Use as many pins as you need to prevent the cloth slipping whilst it’s being stitched.
Pin another line approx 5- 10 cm ( 2″ – 4″ ) away from the seam, checking that the pattern beneath these pins is equally well matched – this row will hold the cloth for you as you stitch it and the pins will hold the pattern in check if it starts to skew.
Prints
1. Look carefully at how the pattern finishes against the two selvedges that you need to join. Fold one side under so that you are looking at the pattern and notice how close to the selvedge it matches, also take note of the most prominent bits of the design – with a rambling type of all-over design, you might pick the tip of a leaf or the centre of a flower – you’ll almost always need several points of reference. Make a couple of tailors tacks if you think you’ll need them for clarity.
2. Place one of the cuts of fabric right side up onto the worktable, with the selvedge facing you. Place the next cut over the first, right side down. Fold over the selvedge showing between 0.5 and 2.0cm (1/4″ – 3/4″ ) of the pattern – approximately where you think it should be matched – it doesn’t matter if the seam width varies each side, as you will trim them back. Press lightly.
3. Match the pattern to the piece underneath – this might be as close as 0.5 cm (1/4″) or further back, and pin along the fold line. Firstly mark the reference points that you chose – along the whole length, then work back through, with the next pin approx. half way between the last two, and so one.
*Always look at the under side to make sure your pin went through at the point it should have – it’s easy not to pin in at a full right angle, but if you don’t, then the pattern has already slipped before you’ve started stitching.
* Pattern repeats are not always totally accurate, so you may need to ease one of the sides at times – using more pins will help. Go back and place cross pins between each pin. Machine or hand stitch along the fold line removing the straight pins and stitching over the cross pins, which provide stability to the piece you are working with.
4. Press the seam from the wrong side and then again from the front. Use the hottest iron and press quickly. Turn over again to the back and press under the seam to remove any pressing ridges. If the background fabric is dark or you are using a woven fabric snip into the selvedges at approx. 5 cm ( 2″ ) intervals. If the background fabric is light, trim the selvedges back to 1.5 cm( 5/8″), or as needed to remove any margin legend that might show through.
Pinning
Pinning two fabrics together might appear to be the easiest thing in the world – to a beginner. A professional, however, knows that correct pinning can make or break a project – and in any case makes the work much easier.
* Most people don’t use enough pins.
* The most secure way to hold two or more layers of fabric together is with pins. Tacking stitches can be helpful but in themselves are not enough even when you are hand sewing and able to keep full control of the fabric.
* Always pin at right angles to the proposed stitching line with the pin perfectly straddling the (invisible) seam line, so that you stitch along the middle of the pins. Position each pin about 2 – 3 cm(1 – 1¼” )apart.
* Always pin with the heads uppermost ( unless advised otherwise for specific purpose ) when you are going to machine stitch. Pinheads underneath the fabric get caught up and are very difficult to remove. If you do get this wrong – and it’s easy to do so – take the time to re-pin. It’s annoying but it will save effort in the end.
* Think how the work will be placed under the machine and pin with the heads away from the body of the machine, as this makes them much easier to extract as you go along.
* Pins positioned behind the first row of pins and parallel to the proposed stitching help to stabilize the layers. Position all pins so that the heads will be towards you as the work is under the machine. They should be able to stay in place but this makes them easy to remove if they do happen to be in the way.
* Most pins can be left in position, or can be removed just as the machine foot gets to them. However, if the work is complex – if you are easing, for instance, the pins will need to be left in.
* For soft furnishings the materials tend to be larger and heavier than for dressmaking. Adding some supplementary pins or simple tacks to hold the fabrics together away from the area you are working on just helps to stabilize the layers as you concentrate on each area, moving it from table to machine and back again. This helps to keep the layers together and the pinned areas true.
* With experience you’ll instinctively know when and how to pin.
* Pinning to ease – such as one fabric to another or gathers and frills:
Easement is needed for a) areas where the fabric has been stretched or worked around a form, e.g. shaped areas such as the corner of a chair wing or a sofa arm, b) to join an awkward pattern repeat or c) to join two fabrics where one is more inclined to stretch than another. The same pinning is used to attach gathers securely to a straight fabric, so that they don’t pucker and move whilst under the machine foot.
a) Pin the fabrics together at the marked points. Pin halfway between, then halfway between again.
b) Just keep repeating this until all fabric is eased in and there is probably no more room for another pin.
c) Stitch carefully along the stitching line, slowly so that the machine needle does not break.
d) To secure, stitch another line close to the first line and within the seam allowance.
e) If the pins allow, leave them in place, or if not, remove half.
Preparing the fabric
It might seem tedious, but taking the time to check and prepare the fabric and to cut with precision will pay dividends on the end result.
There is nothing more disappointing than getting ready to start only to find faults with the fabric that you didn’t expect – that it’s off grain, you’ve under-ordered, or any other such reason that prevents you from getting going straight away.
In our professional workrooms we account for the cutting and preparation time separately from the making time. Cutting is very important and so is the thinking time that goes into it; we make time for the fabric to hang to acclimatise to the ambient conditions, even if only over night.
Remember that once the cloth has been cut it can’t be returned unless the flaw is serious, and as the cloth is checked at source most flaws aren’t. We try not to return as it takes time, so we work with the cloth as far as we can.
- Check for flaws
Go through the roll and check any tagged areas; check through for your own purpose, looking for any small holes, an uneven weave, missing threads, a slipped or mis-printed pattern. Note the flaws, then plan the pieces you need to cut out around them. You may not be able to avoid everything, so try to accommodate them instead of sending the fabric back. For example, try to get any flaws into hems and headings, or if a small flaw will show cut the least important piece from this area– for the hem on a curtain return that is in a corner, within a pleated heading, or slightly reduce the fullness
- Check the Grain
The warp (the vertical threads) and the weft (the horizontal threads ) should be at right angles to each other; this is called the ‘true grain’. The fact is that the cutting line is rarely on grain and you need to know how this impacts on your project. Some projects can accommodate a less true grain, others can’t. Roman blinds for example must be true both ways; and so must all checked fabrics.
Lengthwise grain
Unless directed otherwise work with the grain – that is parallel to the selvedge from the top to bottom – through the roll or piece. The fabric is almost always at it’s strongest made up with lengthwise grain. See Railroading.
Crosswise grain
In the finishing process, the cross-wise grain can be pulled off or true; the pattern can also slip during printing so that it runs very slightly less true with each repeat.
* When the hem cut line is at an obvious angle to the sides, you have to make a decision as to how to cut and work with the fabric: if you make the hem to pattern, the side will kick out, but if you make the hem to grain, the pattern won’t match at the leading edges. In such instances the pattern at the leading edge must take priority, and each leading edge should match its partner. An overall print can be allowed to run out a little towards the outside edges. For a small geometric print, try to stretch the grain to re-align pattern, but if it’s way out just return it.
* To diminish a problem by stretching a cloth back: dampen it by spraying with plain water , then pin or clamp it to the table so that the four edges are square. You may have to pull very hard on one or more of the sides. Steam any cross ruckles away with a damp cloth and the hottest iron. Leave the cloth to dry overnight, or longer if it needs it. When it comes off the table it should be straightened, or at least better. It’s wise top leave it a couple of days to see it if returns to it’s earlier form before you plan exactly how and what to do.
Railroading
Railroading describes when either:
- a) you choose to cut the fabric the other way; for example, cutting for a bed valance along the length to avoid seams, or using a striped fabric in a different direction than the original design.
- b) very occasionally, the fabric is woven with the strength across the width and that is how it is best to use it.
- The Selvedge
At each side of the roll the threads are more tightly woven, but can in reality be looser or tighter than the body depending on the reaction of the cloth to the finishing processes.
* If the selvedges are tight, snip them diagonally all the way along so that they now lie flat.
* If they are printed and the ground colour is light, trim the selvedges away close to the start of the printed pattern, ie cutting away any legend.
* If selvedges include contrasting coloured threads they are usually really attractive; you probably won’t have known beforehand and now have an unexpected bonus on your hands, albeit one that might demand a cutting re-think. You might want to use them to show at the leading edge of the curtains, trimmed off for ties, as the closure for cushions, or for the hems of bed valances or blinds.
- The bias
The bias is the line at 45º to both width and lengthwise grains: folding a square of material in half across the diagonal reveals the true bias.
Anything cut on the bias has a stretch to it; piping or bindings cut on the cross can be used to go around curves and will lie flat once pressed.
- Right and wrong side
Most fabrics come on a roll with the right side wrapped inside; if lapped, cotton and linen tend to be folded right side out, and wool with the right side folded inside.
If it’s not clear, look at the selvedge: the front should look better finished; the face of damasks or jacquards is usually the one with the most sheen; dobby weaves are more raised on the front.
If in doubt, just choose the side you like the best, whether or not it is the ‘right’ or the ‘wrong’ side doesn’t matter. Just make sure the pattern is the right way up!
- 5. The Nap
The nap is the direction of pile. Some fabrics have an obvious nap: velvet is the best known, though most cut and looped piles, some corduroys and brushed finishes have one. Most don’t, but you can get caught out, so for the avoidance of error, always cut the same way off the roll and mark the top of each piece.
When the pile faces down it shows the softest colour, and is best for avoiding particles of dust that catch in the pile; with the pile facing upwards the colour is sharper and brighter; if this is what you choose for curtains, you’ll just need to shake and brush them a bit more often.
- Straighten the end of the roll
Plan the first cut, allowing enough for the hem allowance. To get the cut line, either:
- a) Pin the fabric to the table with the selvedges pinned to the sides; cut the width along the adjacent table side for a straight cut.
- b) If you do not have a table, fold the end over by about 60 cm so that the sides are lined up exactly. Measure across the width and mark a line at an equal distance of approx. 58 [cm?] from the fold, then trim the raw edges to it.
- c) Pull a thread to This is a good option and arguably the best, for a loose weave or a linen where there is an obvious line to follow but impractical for tightly woven fabrics
- Fabrics for washing
Always test a 10 – 20 cm square in hot water before you start, and either pre-wash the whole fabric or over cut to take the shrinkage into consideration. It’s alright to make a loose cover over sized, but fabric that will be frequently washed once it’s made up ought be laundered either before or after cutting – though always before making up.
- Cutting Out
Fabric straight off the roll is beautifully smooth and even; if your fabric is folded or creased, start by pressing this line out.
To avoid making any errors, mark each piece as it comes off the roll to distinguish the right side and right way up; for the sake of consistency, mark the top of each right side with a coloured tack or crossed pins.
- Let it rest
Hang cut lengths over a bannister rail, a pole or the table for at least twenty-four hours to allow the weave to relax and if it needs to, to pull back.
Pressing
The single most important key to a successful project is pressing. Often ignored and underestimated, the iron should be at your elbow throughout. On the worktable closest to the sewing area. From the outset, you cannot expect to cut a ‘flat’ fabric accurately if there are creases and ruckles in it.
Heat, weight, the press cloth, pressing balls, rolls and steam are the essential ingredients for the various processes, all the way through
A good steam system that can be held close to or away from the finished work will bring the best possible result, and therefore the most successful project.
* Tip: to remove small surface creases, dampen a corner of the muslin cloth and rub over the crease- as if you we rubbing it out, then press and it should magically disappear.
THE PRESS CLOTH
Make a habit of using a press cloth between the work and the iron, as it protects the main fabric from the heat of the iron and when damp adds an often essential input of steam. In our workroom we use muslin squares, cotton and linen tea towels and glass cloths; these different weights accommodate most textiles.
For all pressing use either: a dry cloth and dry iron; a dry cloth with a steam iron; a just-damp ( well wrung out) cloth with a dry iron; a damp cloth with a steam iron. If a damp cloth is dried too quickly by a too hot iron, the fabric beneath could shrink where you don’t want it to.
* The ideal size is about a 40 – 50 cm ( 16″ – 20″ ) square, or half a tea towel.
* Muslin or lawn is perfect for silk and fine cottons and fine detail, as you can see through it.
* Muslins can be easily folded to accommodate different uses, so if you only have one cloth a firm muslin or lawn is the one to choose.
* Wool over wool retains the springiness, or use wet cotton press cloths if you want to shrink it to shape.
* You can often use a spare piece of the main fabric.
STEAM
Steam is the magic ingredient for making properly flat, and even, edges and seams. The right balance of steam and heat is best judged by experience, so always test your fabric first. Too much steam and / or pressure and these lovely crisp edges can easily become over-flat or over-stretched.
The new high steam irons that send the steam through the flex from a hot tank have revolutionised the final press. They can lift a crease right out and also dampen a tricky point with a single blast, which you can then finger press.
* Curved sections, fitted panels and awkward shapes are best pressed over a pressing roll or ball.
* Once the fabric is dampened, work it with your fingers to deepen the shape or to flatten, or to fix whatever it is that needs fixing.
* Use a piece of fabric covered wood, e.g. the back of a brush, to ‘knock’ the steam into the cloth.
* Allow the cloth to dry before you start the next stage of work.
* When the steam iron is held approx. 3″ away from the fabric, a press cloth isn’t necessarily needed; this is best method for the final press.
FINAL PRESSING
When the work has been pressed properly throughout, the last ‘press off’ is to iron the large surfaces, just to take the small handling creases out of the worked areas.
A professional steamer is appropriate for the finished product, especially for curtains, blinds and pelmets and is essential on site, especially if there have been overly long delays between making and hanging the work. However, it is no substitute for the essential pressing during the making. You can’t use steam to correct poor process.
YOUR FABRIC
Some fabrics require special handling; always test first so that you know your fabric.
THE TECHNIQUES
* Press at every stage – the work will be easier, more accurate and you’ll have dealt with sections that are otherwise impossible to get to once the work is finished.
* Pressing is just that: you lift the iron and press: don’t push it along, as this just stretches and distorts the edges.
* Always test your fabric to see what temperature it can take, how it reacts to dry pressing and to steam – pressing over a damp cloth. Check it against the original piece to confirm that the finish, the sheen and the colour have not been affected by the heat, the damp or both.
* The hottest iron and the quickest press gives the best results.
* Press with the grain of fabric, and when pressing the bias be careful that it isn’t being stretched.
* After every stage of work press along the stitching line to bed it in, then from the wrong side and then the right side. From the right side, always do so over a dry or a damp cloth. For corners and awkward junctions, press only the immediate area over a pressing roll or sleeve board.
* To achieve the best seam finish, you need to embed any stitching into the fabric by pressing. Firstly press along the stitched line, then open the seam and press from the back, turn and then press again from the front – this allows you to check that the seam is properly open and to root out any little tucks at the stitching line. Of course, if your fabric reacts badly to the iron you’ll need to use cloths and strips of fabric beneath the seams , which takes a while but is well worth it.
* For delicate and sensitive fabrics use calico or brown paper strips tucked under the seam edges, pintucks, darts and any other process to prevent imprints coming through to the face.
* For sensitive/delicate areas use the tip of the iron only.
* Work in the same direction as the stitching.
*Never press over tacking / basting threads or pins – they will mark, indent, the fabric.
* All processes must be pressed before they are either worked on again, or crossed. So it’s ok to stitch several separate, parallel seams for one press, but not one that crosses another unpressed seam.
* To remove a stubborn, sharp crease rub over it with damp cloth and then press.
* To release low-level multiple creases and crumples, treat the area with a quick spray starch and they’ll just melt away under the iron.
EDGES
To avoid a firm crease, either steam press at a distance of about 5-8 cm ( 2″ – 3″ ) and lightly knock the steam in, or press lightly and quickly over a dry cloth. Or avoid the last 2mm( 1/8″ ) of the edge totally.
PIN TUCKS
Press from the front along the stitching line with the tip of the iron; keep the edge free if you want it to remain soft, press it all if you want a sharp edge, then press the seamline from the back. To press the area below the stitching line use a sleeve board; don’t press the bottom of the tuck as it’s easy to distort the fall.
For narrow tucks, slip a paper or fabric strip beneath to prevent ridges.
GATHERS
Press the seam allowances of gathers before stitching; this flattens the fabrics and reduces the eventual bulk.
Also lightly press the seam allowance after the first stitching line, leave the pins in and don’t flatten the lovely gathers into pleats, it’s just enough to prevent the gathers walking as the second line is stitched.
Once stitched, press the seam allowance only from the wrong side, using the tip of the iron and as close to the stitching line as possible. If you do need to press any creases from the gathered material, it’s helpful to use a sleeve board so that much of the fullness falls away.
PLEATS
Pleats are finger pressed into shape as they are made; most are pinned into place, then secured with tacking, before they are taken back to the sewing machine. After the stitching, press to remove any working creases, holding the iron 5-8 cm ( 2″ – 3″ ) away so as not to imprint the tacking threads into the fabric. Once the tacking threads are removed, leave the pleats to hang out and then steam to revive.
BUTTONHOLES
Press around buttonholes to remove the working creases.
Stitched:
Press from the front and then the back over a damp cloth to embed the stitches. When the threads ‘bed in’ the buttonhole comes together and it looks better, is more secure and hardwearing.
Bound:
Each stage of the making process is pressed; for the final press, press from the front, over a dry cloth, just to embed the stitching lines, then the area immediately around the buttonhole to remove any fine lines over a dry or slightly damp cloth.
CURVED SEAMS
Press from the back, with the seam over a pressing ball or roll. Take it one section at a time, adding snips or notches as necessary for the seam to lie flat. If needed, slip a strip of calico or paper beneath the seams to prevent transferring a ridge to the main fabric.
Press from the front, taking the opportunity to manipulate the seam to straighten it, to make it look even and true.
Hold, shape and steam deeply curved seams as needed.
GORES
The top of the gore and any sharp points at the head of a dart or an inset are tricky areas that can be vastly improved with pressing. Press the seams lightly from the back, and away from the inset. Turn over and press from the front, re-aligning the seamline to look better if necessary; this enables you to overcome most wobbles and make a true point, a small correction will stay in place, for a larger one the proper line is made and it can be handstitched in place, following the pressed edge
ZIPS, POPPERS AND HOOKS
Press the back, press the tape sides, press close to any folded fabric edges and between each fixing. Avoid pressing over zips or any closure fitting.
PLACKETS
Press over a padded cloth or pressing roll, depending on the seam and situation. Press the stitching to embed, then from the front, so that you can see how it looks; press or steam away any puckers, between ties or fixings, and be careful not to stretch the cloth especially close to the thicker placket section. Press it open and then closed.
GUSSETS
The ends and intricacies of gussets can be difficult to get to once work is complete; if the pressing ball or roll aren’t suitable, fold a wadge or wedge of muslin until it fits beneath the area and press or steam the troublesome area.
Pressing seams
These are the three most used seams, and the essential tips for pressing.
Always press every seam as soon as you have stitched it. Press from the back and then from the front – this beds the stitches in and makes a huge difference to the result.
Fine Fabrics
The seams of fine fabrics, especially of silks and organdies, need careful attention; always insert a strip of fine to medium weight cotton between the seam and the main fabric to prevent any ridges forming on the front.
Flat seam
From the wrong side, press the seam open. Turn the fabric over and press from the right side.
Press again from the wrong side, this time also press under the seam flaps to remove any potential indentations or marks.
Use steam if necessary to flatten a springy fabric; to shrink, ease, or remove any ruckles or distortions.
When two seams cross each other, trim one of them back – cut a square out of each seam allowance so that the junction lies as flat as possible. Steam press to flatten.
French seam
Press from the wrong side, pressing the seam away from the iron. Turn over and press the seam line so that it is neat and crease-free. Turn back and either re-press the seam and /or press beneath it to remove any potential indentations or marks.
Flat fell seam
Press from the back, then from the front. Steam and knock the steam in as necessary to create a good line.
If any seam is slightly distorted or springy, or just seems to need some help.
Pin each end to the worktable, stretching it slightly and then steam press again. Leave it to dry out, still under tension.
Seams
Time spent making sure that everything we make looks as good inside as out is never wasted.
Seams are for joining lengths of fabric together, and are usually unseen from the front.
Broadly speaking, where the seam should be ‘invisible’, a flat seam, or open seam is used. Where the seam is, of necessity, visible such as with unlined or sheer curtains, then the seam should, in some manner, fully enclose the raw edges. The most used is the French seam, but where it needs to be fully reversible or bomb proof then a flat and fell or welted seam does the best job – this is the type used for denim jeans that shows double stitched rows.
For a flat seam the raw edges can be left raw or finished, firstly to prevent any possibility of fraying, sometimes for decorative reason. The situation will always determine the need for finish and the type of finishing that is possible and preferred.
Any finish adds bulk, so when the back of the seam is not directly visible i.e closed, or covered, by linings, interlinings, within cushions, valances etc. then the seams are trimmed – neatened, pressed and left.
Finishing:
Hand finished seams are the ultimate expression of a handmade garment. In the world of soft furnishings, seam finishes are almost always disregarded, however when they might be on show, and even when they are not, it’s worth making sure the best finish has been chosen.
Seam edges can be: pinked, straight stitched, folded under, overlocked or bound. The first four are always essentially practical. Binding might also be decorative, so close matched to be as insignificant as possible or coloured as a design feature in it’s own right.
Choosing the type of seam and the finish:
As the choice depends very much on the textile and the use, appropriate guidance will be given with each project. However, this is the general synopsis.
PREPARING TO MAKE SEAMS
Leave cut lengths overnight or, preferably, for 24 hours before seaming to allow the fabric time to adapt to your room and to being released from the roll.
Stitching:
Stitch all seams from the same direction – if the fabric does move a bit at least the lengths will all have moved in the same direction.
Top and right sides:
* Refer to the tacked marks made on each cut that confirm the top of each and the right side, as you pin pieces together.
Stitch direction:
*We always start from the bottom of our projects, and work upwards, as the lengths are almost always planned from the floor, or at least the lower edge, to the top.
* For a difficult fabric – one where the pattern won’t match or is inclined to stretch, we might start at a middle point and stitch from there, both down and up. For curtains, the starting point would always be at a pre-determined eye line, so that all curtains or blinds in the room have the same starting point.
For a fabric with any level of stretch – especially those with loose or open weave:
* Stitch all seams with a slight zig-zag: 1/2 – 1, no more. Test a small sample – you’re looking for just enough tolerance to allow the fabric to drop a little without pulling at the seam, but with the narrowest possible zig zag, so that the seam can still be pressed flat.
This small adjustmens to the stitch works wonders for many fabrics – especially the long curtain seams.
Fraying:
Fabrics that fray are difficult to work and thankfully there are few of them – something like a fine silk organdie can be very frustrating, as you are likely to be using it for intricate work. In any case sometimes there is just nothing else that will do the job.
If the fabric is at all likely to fray, run a machine stitch a 5 mm (1/4″ ) from the edge to hold the edge before making up, and over-sew afterwards. This is called stay stitching.
SPECIAL CONSIDERATIONS
Pile/nap
Make sure that the pile (the nap) of the fabric runs the same way on each length. Velvet is the one we all know and respect, however more fabrics have a ”right way up” than you think, which is not always obvious in a sample or on the table, but will be when the curtains are hanging.
* Always mark the top of each cut on the right side and always refer to these markings.
* Stitch with the nap rather than against it.
* A very shallow zig-zag stitch helps with velvet.
* Pin and stitch a scrim strip into the seam. This will help prevent the fabrics slipping against each other. Use one with a relatively open weave, one that you can pull away easily afterwards. After stitching the seam, trim the scrim strip tight to the seam from the front and pull it away from the back; tidy up any loose threads.
Long pile
Snip the pile away from just within the given 1.5 cm ( 5/8″ )seam allowance to the edge, before stitching. Pin the seams together. pushing as much of the remaining pile inside as possible. Once the seam is stitched, working from the right side use a needle or skewer to tease out the pile caught in the stitching. The pile will fall as if there is no seam, comb or brush it if it needs it. Press the seam flat, from the back, over a needle board.
Delicate fabrics
All fine materials will pull given half the chance, just take care that there are no stray pins or sharp edges around on which the threads can catch.
* Always use new pins and a fine, brand new needle: the slightest blunting or burring on a used needle that will have little or no effect on a thicker fabric can wreak havoc on a fine one.
* If the fabrics are intent on slipping, cut tissue strips to pin between the seams. Tear these away gently once the seam has been stitched.
Leather, suede and faux suede
Faux suede is quite easy to manage. If it has a backing material, tear it away along the seam lines before stitching. This is not to make the stitching easier but so that the seam lies flat when it’s pressed.
Leather and suede are quite manageable for a relative beginner, especially for small projects, but for a larger project, especially when pieces need to be joined, specialized machinery is needed to cope with the stitching and stretch – perhaps have it joined by a leather worker, then you can finish it yourself.
* Use specialized needles that cut small holes into the material as they stitch, to accommodate the thread.
* Any wrong stitch will leave a mark.
* Small bulldog clips hold the layers together effectively when pins can’t.
…………………………………..
THE BASIC FLAT SEAM
This is the seam for almost everything; it is the simplest to make and is unobtrusive, with no lines of stitching visible from the right side. It’s described here in detail for the very beginner and as an aide memoire to experienced makers:
a) to press the stitching before opening up the seam
b) to press the seam from the from the right side as well as the back
c) to use a dry or damp cloth, as appropriate.
* If the seams have not been stitched perfectly pressing gives an opportunity to ‘shrink’ the imperfection away by steaming the seam line over a damp cloth. Press any ridge marks away from the back of the fabric, beneath the seam allowance. See Basic Techniques- pressing.
Making the seam
1. Place the two fabrics, right sides together, on the worktable, lining up the raw edges of the pieces to be joined. All seams should be pinned together with both fabric layers flat.
2. Position holding pins along the whole length. These should be parallel to the raw edges, approx. 20 cm ( 8″ )apart and 3 cm (1 ¼” ) in from the edge. Pin again between these, so there is now one pin every 10 cm (4″ ) or so.
3. Now pin at right angles to the fabric halfway between each of these. These pins will be taken out as you stitch, the first pins will stay in place to help prevent the fabrics from slipping.
* Always position with the heads away from the raw edges to make them easy to remove as you stitch.
4. Stitch along the seam allowance – i.e. 1.5 cm ( 5/8″ ) from the raw edges using the machine foot as your guide. For the first few seams you might want to pencil the seam line on but your eye will soon become quite reliable.
5. Press along the seam on the wrong side and remove all pins. This pressing helps to bed the stitches into the fabric and just makes a better end result.
6. Press the seam open and the seam allowances down.
7. Turn over to the front and press along the seam line with the tip of the iron. If the seam is less than perfect – it may be that despite your best efforts the fabrics moved a bit, or that one side needed a bit of easing to make the pattern match – you can limit some of the imperfections by pressing the seam holding the iron straight down, over a damp cloth (refer to the ‘pressing’ section).
8. If the seam edges have marked the fabric, press lightly under each seam flap to remove the pressed ridge line.
Delicate fabrics
For fine silks, any lightweight muslin strip or tissue paper. Otherwise strips of calico (washed and pre-shrunk) or any evenly woven, smooth cotton.
TRIMMING THE SEAMS
Seam allowance
The usual seam allowance of 1.5 cm ( 5/8″ ), that is fine for most projects, doesn’t need to be cut down just for the sake of it. If it’s trimmed too tight it will roll or twist in preference to lying flat. A bouncy, heavier weave fabric benefits from a larger seam allowance of, say, 2 cm (3/4″ ).
Grading or layering
When the seams are pressed to one side or include piping and joined pieces, the amount of layers can escalate, to six or eight – especially with loose covers – and the resultant bulk is both awkward and ugly. In this case grade – trim down – the width of some of the seams.
* In all trimmed seams, do not trim the side that lies against the main fabric, leave this one to its full width to give a smoother finish from the right side.
Pressed to one side
If both seam allowances are pressed to one side, one should be cut down to reduce the bulk and the chance of a permanent ridge mark in the main fabric.
Multi layers – method 1
To grade several layers, trim each layer a little more than the last, to give an evenly graded finish.
Multi layers – method 2
Cut away the inside layers, so that the outside ones can be brought together and over-sewn or bound, thus enclosing the inner layers.
PERFECT CORNERS
Perfect corners make all the difference to a project. So much about sewing is learning how the fabric should feel – a bit like making perfect scones and sponge cakes – so if you are new to this, take the time to make a few corners in calico and with an off-cut of the project fabric, to perfect the technique.
Stitching
To make perfect corners, stitch up to the corner as far as the seam allowance. That is, if the seam allowance is 1.5 cm (5/8″ ), stop 1.5 cm (5/8″ ) before the edge, with the needle in the fabric. Lift up the presser foot and turn the fabric through 90 degrees, then lower the foot so that it sits parallel to the raw edge and continue sewing. We often stitch the corner twice. Trim the fabric back before turning out.
Bulky corners
When the seams are piped, keep as tight to the piping as possible. With loose covers, there may be times when the corners are best stitched by hand – if you have layers of a bulky fabric, stop and fasten off the seams approx. 2 cm ( 3/4″ )before the corner, then hand stitch with a back stitch and a strong thread to make a secure, neat finish.
Sharp corners
Follow the seam allowance, then stitch again across the corner, just take the very tip of the point off. Trim the seam back as close as your fabric allows.
BOXED CORNERS
This is for the gusset, or border, of a boxed cushion. It can be in the same material as the top and bottom or contrasting in colour, texture or finish. Or it might be the printed design at the edge of the curtain width. In any event, this border or gusset will become the focal point and the depth must be exactly even all the way around. The only way to be sure of this is to cut accurately and to keep fastidiously to the seam allowances. The top and bottom are often piped, so the piping must also be put on correctly.
Don’t expect this to be as easy as it looks – especially on the first attempt. Often one corner is fine, it’s getting them all right, then matching the tops and bottoms of the gusset that is a bit more taxing. Practise a single corner first, as once you’ve mastered exactly how to pin it on (a fraction too tight or loose makes a big difference) and stitch around it, the rest will fall into place. And it’s really worth mastering this technique on a single corner first.
Pin the border or gusset up to the corner as far as the seam allowance, i.e. if the seam allowance is 1.5 cm (5/8″), stop short at 1.5 cm (5/8″). Snip into the whole seam allowance, turn the border around the corner, so that the snipped corner matches the point of the flat corner exactly. To stitch the border in place, stop the machine with the needle remaining in the fabric exactly at the corner point. Lift the presser foot, turn the fabric through 90o, lower the foot, so that it sits parallel to the raw edge and continue sewing.
Stitch around each corner again, to secure. Snip across the corner before turning the corner out.
CURVES AND SHAPES
Seaming curves and shapes is straightforward provided you follow the seam allowance exactly, re-stitch tricky areas to secure, then snip the seam allowances according to the direction of the curves and points. Once stitched and pressed, layer the seam allowances and trim back as close to the stitching line as possible. Remain aware of the potential of fabric to bounce, tear and fray and don’t lose sight of the fact that, whilst you are trimming away from the back, it’s what you see from the front that matters: a mistake we can all make with some distraction or other, however experienced. Always test on a spare piece of the fabric to be used first: know your enemy.
* A snip is to allow the seam allowance to expand, a notch is to cut excess seam allowance away.
* The seam allowance of a concave curve needs to be ‘expanded’ when it is turned out: cut snips.
* The seam allowance of a convex curve needs to be lessened when it is turned out: cut notches.
* The ideal is that the cut edges line up to form a continuous surface inside. After a few cuts, turn it right side out to see what is happening. If there are gaps, take less out of each notch; if there are overlaps, take a little more.
* After stitching and snipping any of these curves and points, turn the piece right side out and smooth the stitching line with the point turner. Press over a pressing pad.
* If the shaped edges are to be top stitched afterwards, evenness of snipping and notching is vital.
* When the shaped edge needs to be beautifully smooth, carefully cut a canvas facing to fit the shape and insert it against the face fabric, so that the seams all sit behind it. In the hem of a roller blind a piece of buckram is perfect for the job.
Curved Corners
Trim the seam allowance to half.
Snip (notch) the seam allowance away so that the seam will lie flat once the corner is turned out.
Serpentine shape
Trim the seam allowance to half. Notch and snip as appropriate.
Any curved ups and downs can be managed in the same way.
Points
The seam allowance needs to be reduced as far as possible where there is a tight point that needs to be turned out. Layer the seam allowance and trim out as much as possible closest to the point without compromising the stitching.
(If you do break through the stitching – and we all have – re-stitch just inside the first attempt: it’s unlikely to make too much difference to the end result. Or re- stitch by hand from the right side.)
Peaks and troughs
Trim the seam allowance to half.
The one point needs more space and the other less. When the easing snips need to go so close to the seam line, a piece of fine interfacing ironed behind can be helpful to prevent tearing. Grade the seams as appropriate.
Continuing scallops
Trim the seam allowance to half, and make notches taking more fabric out as the curve becomes steeper. Snip deeply into the points.
An evenly flat seam inside will matter if the fabric is quite fine and the ridges show.
Anything more extravagant
Trim the seam allowance to half, and make notches and snips as necessary.
Interfacing
For a border, or the hem of a Roman blind that needs to be flawless, an interfacing against the back of the front piece will smooth out the seam lines. The interfacing material needs to be woven and smooth but neither too floppy nor too stiff.
Alternatively, set an interfacing in after stitching. Draw around the finished shape onto a piece of canvas – it needs to be firm but malleable. Cut out and trim 5mm (1/4″ ) inside the outer edge. Insert this into the shape to give a smooth finish. Stitch in place from the back or finish the front with neat top stitches.
FINISHING THE SEAMS
Seams that don’t fray and that will be enclosed on an item that will be washed rarely, such as on the inside of lined and interlined curtains, pelmets and bed valances, don’t need to be finished at all and will lie all the better for being left alone. However, if a flat seam is exposed, it should be finished in some way, whether or not it is likely to be washed: it will look better for longer. For a robust fabric, it might be enough to trim the edges with pinking sheers. Otherwise, choose the most appropriate option below.
Oversewing
Oversew by hand – these small diagonal stitches will stop the edges fraying. Use the finest thread you can and make the neatest stitches; lightweight materials are inclined to collapse at the edge if the stitches are pulled too tightly, in which case a fine muslin or tissue backing will help. (This method is not for a complete beginner.)
Folded edge
Turn the edge under by approx. 3 mm (1/8″ ) and machine or hand stitch from the top and close to the fold.
Binding flat seams
This is the ultimate seam finish – haute couture if the stitches are minute and the binding perfectly even.
Make up strips of binding on the straight or the cross from light cotton or satin, or even use a bought satin ribbon or bias binding. Fold over the seam and hand stitch in place.
Self bound seam
Trim one side of the seam allowance to 5 mm ( 1/4″ ). Fold the other side over to enclose the raw edge. Either slip stitch the edge to the seam stitching line, or stitch closed with a running stitch as close to the edge as is comfortable.
Self bound seam, frilled edge
This one works the same as above but with the frilled seam allowance trimmed down and the flat side enclosing it.
Binding closed seams
Bind both seams together with separate binding strips – cut either on the cross or on the straight – or with satin ribbon.
Loose cover arms
I’ve included these here, as often a number of cuts need to be made right into the seam lines in order to make a good fit around an arm/back junction, which makes this area particularly vulnerable, as the whole point of a loose cover is that it can be laundered frequently and fearlessly.
Arm – back junction
Open the curve out as far as it needs to go, and bind with specially cut bias strips of linen or cotton scrim – firm but not too tightly woven. Or use the loose cover fabric if it is suitable. Hand stitch these to the seam allowance on both sides.
Re-inforce by machine stitching 5 mm ( 1/4″ ) in from that. And repeat if you think it needs it.
Arm fronts – curved
To sit neatly around the arm any excess fabric needs to be taken out and any ‘stretching’ neatened. Bind as above but before you stitch, tack and check that it sits well – snugly – over the chair arm.
Top stitching
Use when the item is likely to take a battering from children and/or laundering and where enclosed seams, such as flat fell seams, are not an option. This is also good for boxed cushions and for loose covers where a clean line is wanted and piping is inappropriate. It is also an effective seam finisher – in most cases you won’t need to neaten the edges of the seam for practical purposes and won’t want to for aesthetic reasons.
With the seam pressed open, turn the fabric so that it is right side up. Put a few pins in to keep the seam flat whilst you are stitching. (If the seam starts to move, add more pins.)
Top stitch by hand or machine, to one side or on both sides of the seam line.
Top stitching across the width of a lapped seam with a decorative stitch to hold.
Top stitching to hold a trimmed seam.
French seam
This is a totally enclosed seam with no lines of stitching showing on the right side of the fabric and is very hard-wearing. Use for sheers and unlined curtains, any occasion when the seam might remain visible; and inside bags, duvets or pillowcases where the wear and tear will be intensive – a French seam is much more pleasing to the eye than an over-locked one.
Vary the width of the seam according to the material: a heavy wool, linen or tweed for instance will require a 10 – 12 mm/3/8 – ½” first seam and 12 – 14 mm ( 1/2″ – 5/8″ ) for the second line.
Making
1.1 Pin the fabrics together wrong sides facing. Stitch 6 mm (1/4″ ) from the raw edges. Trim any unevenness or frayed ends. Press the seam to one side, from the wrong side.
1.2 For an exquisite finish and a very sheer fabric, carefully cut this seam back to 2- 3 mm (about 1/8″ ).
2.1 Keeping the fold line stable, pin along the edge of the seam, approx. 8 mm (3/8″) from the stitched edge. Stitch along this line. Press from the right side always pressing the seam in one direction only.
2.2 Stitch this line as close to the inner seam as possible. For something like silk organdie that is inclined to fray, trim any fine stray threads tight to the stitching line.
Press the seam to one side. Turn over and press carefully from the front to bed the seam in – press from one side to avoid creating a ridge.
False French seam
This, as the name suggests, has a similar function to a French seam but is more like a closed flat seam in construction. Used when a French seam might be the choice except for the amount of corners to contend with. This is more difficult to get exactly right than it looks, so keep this one for when it is the only realistic option. Increasing the seam allowance makes the delicate turnings easier to handle but only if the proportions then relate to the scale of the project.
With fabrics right sides together, make a seam 1.5 cm ( 5/8″ ) from the raw edges. Press the seam flat.
Turn in 5mm (1/4) towards the seam line on both sides of the seam and press. Fold the turnings towards each other, stitch through both folds of the seam allowance.
Welt Seam
This is very similar to the flat fell seam. It’s worked from the wrong side, so is only suitable for plain materials and those where the raw edge can be left exposed. I’d use this for joining heavy fabrics such as wool, felts, suede and faux suede. Only one line of stitching shows on the right side, and you might chose to do this by hand using prick stitch or similar to produce a decorative effect. In which case, work from the right side, so that you can follow the stitching line exactly. If the selvedge is good, it can be used in whole or part. Test a piece of your fabric first – you might prefer to increase the seam allowance a little.
With right sides together, stitch along the 1.5 cm ( 5/8″ ) seam allowance. Press to one side. Trim the lower seam allowance to 5 mm ( 1/4″ ).
Stitch the upper seam allowance to the main fabric to enclose the raw edge. This stitching will be visible on the right side so take extra care with the tension and the thread colour. If hand stitching, work from the right side of the fabric, for accuracy of line. Tack first, pin some anchor pins on the right side and stitch right through.
Lapped Seam
This is similar to the flat fell seam, with the advantage that the process starts from the right side. It’s appropriate and very useful for pattern matching prints and weaves. Use the selvedge if it is suitable. For this, as for flat fell and welted seams, the stitching can be decorative and can be done by hand, if you prefer a couture look.
Press under 5 mm (1/4″) along one raw edge (not the selvedge). With right sides uppermost, lap this edge over the seam allowance of the under piece so that at least 1.5 cm (5/8″ ) is covered. Pin and tack. If you are pattern matching, use securing pins and back stitches – enough to prevent the pattern from slipping under the machine foot.
Stitch the seam from the right side, through all three layers of fabric. Press.
Again, if it’s over a short-ish area, you might prefer to hand stitch this with prick stitch or a neat running stitch.
Press again. Slip stitch, machine stitch or hand stitch the lower raw edge (perhaps the selvedge) to the top layer, enclosing the raw edge.
Flat fell seam
Suitable to join any weight of fabric, this is a very strong seam for projects with high use, as the raw edges are very well enclosed – the proof of the pudding is seen in the seams of jeans and reversible wool coats. Either one or two rows of stitching can be visible from the right side, either way the seam will be noticeable, so position it with care and either use matching thread to minimize, or do something to make the stitching a feature. Top stitching – prick stitch or a neat running stitch – can be used as a decorative finish on the front. Suiting and coat fabrics make excellent soft furnishings – hand worked stab stitch and prick stitch finishes belong in both worlds.
To give two visible stitching lines
1. Pin the fabrics with wrong sides together and stitch the seam allowance 1.5 – 2 cm/5/8 – ¾” (depending on the thickness of the fabric) from the raw edges. Press to one side. Trim the lower seam allowance right down to 3 – 6 mm(1/8 – ¼” ). ** see box below
2. Press under 6 mm (1/4″ ) of the top seam edge. Fold this side over to enclose the lower raw edge. Press down. Machine or hand stitch close to the fold line.
To give one visible stitching line
If you make the seam ‘inside out’ only one line of stitching will show. Start the first seam with the right sides together and work as before.
* Make a test piece to find the best measurements for your fabric and project before you start. You can adapt these measurements so that a) the folds and raw edges overlap inside or b) they butt up.
Scissors
Scissors must be comfortable to hold, or they tire your hands. You need two pairs, sheers for cutting out and a small, sharp hand pair for cutting the short ends.
For cutting out the ideal dressmakers or tailors sheers are large and solid, with one sharp point and one blunt one, the blunt one always on the lower side: these need to be bought from specialist suppliers, and take some practice to get used to.
For general access there are good enough quality sheers, that are comfortable to the hand; for ease we use the ones with orange handles.
Stitches
Back stitch
Back stitch, the pre-runner to machine stitching, should be used wherever the machine is not.
Bring the needle and thread through to the top. Insert the needle again about 3 mm (1/8″ ) behind this point, take the needle along underneath and re-insert it 3 mm ( 1/8″ ) in front of this point. Continue to complete the stitch behind and to make the next one in front, as shown. The threads on the underside are twice as long as those on the upper side.
Blanket stitch
Named after its use in neatening the raw edges of woollen blankets, blanket stitch is unique in that it simultaneously neatens and decorates a raw edge. You can apply this stitch straight along a raw edge, or turn the edge in just short of the stitch length, say 7 mm (5/16″ ) for an 8 mm (3/8″ )stitch.
This is most comfortable worked from the side with the edge towards you. Fasten the thread and insert the needle down through the fabric 8 mm ( 3/8″ ) from the edge (or at whatever distance best suits your project). Head the needle to the edge of the fabric at a right angle to the fabric. Pull through, holding the thread under the needle. Pull up to make a loop on the edge. Reinsert the needle 8 mm ( 3/8″ ) away from the original insertion point and continue to make a stitch as before.
Buttonhole stitch
Used to neaten the edges of buttonholes and wherever a raw edge needs to be strengthened or neatened. Also used to stitch hooks and eyes, poppers and rings in place.
Work from left to right with the finished edge uppermost. Push the needle from the front to the back, approx. 3 mm (1/8″ ) above the edge. Twist the thread around the needle and pull the needle through, carefully tightening the thread so that it knots right on the edge to form a ridge.
Gathering stitch
If you have a machine you’re unlikely to be hand gathering for anything other than a small or special piece of work. However, hand gathering does give the best result, because two line gathering makes a more secure frill that holds itself in place very neatly and only with hand stitching can you ensure that the stitches are in line with each other, to make the best gathers.
Stitch two parallel lengths of running stitches, so that the stitches line up with each other exactly, one row on either side of the seam allowance. Leave both ends of the thread loose. Either secure one end (by wrapping the thread figure-of-eight style around a pin) and pull up from the other, or for a longer length of work, pull up from both ends.
Tip ! Only run the threads for a maximum of 50 cm (20″ ) before you start a new set, to avoid the risk of thread breaks.
Pull up the threads and finger gather evenly, securing the threads around a pin when they get too long.
Hemming stitch
This is to hold a folded edge to flat fabric, however, I prefer to use slip stitch for hems and to use this stitch mostly to fasten two woven fabrics together where there is no seam.
Hold the folded edge towards you, fasten the thread inside the fold and bring the needle out through the fold line. Catch a couple of threads from the flat fabric, then, with the needle slanted in the direction of travel, pick up a couple of threads at the very edge of the fold. Pull through gently to form the stitch.
Herringbone stitch
Herringbone stitch is used over any raw edge, wherever a lining will cover it. It secures curtain hems and sides without the ridge of a folded edge. This is a rhythmic stitch once you get the hang of it and can be executed neatly and evenly, the size of stitch adjusted to suit the situation. It’s best not pulled too tight.
Herringbone can be used for decoration over a raw edge using tapestry wool, or a thick thread.
This stitch is worked in the opposite direction to all other stitches; so a right-handed maker will work from left to right whilst holding and using the needle from right to left. Each stitch should be approx. 3 cm ( 1¼” ) long for hems and 8 cm ( 3 1/4″ ) long for side turnings. Bring the needle up through the hem, take it diagonally to the right, and make a small backward stitch just above the hem – into the main fabric again or into interlining. Bring the needle diagonally back to the hem and make another backward stitch into the hem.
Ladder stitch
Ladder stitch is used to join two folded edges invisibly together; either to join two separate fabrics or to stitch a hem closed on a sheer curtain, to close the open ends or sides of ties and bows, or wherever external stitching should be invisible. Life is easier if the needle is selected to suit the weight of the cloth and the size of stitch, i.e. the finest needle for silk roses and the heaviest to join open weave tweeds.
It is used as a tacking stitch to hold two fabrics together securely, especially when matching a complicated pattern – the occasional back stitch and retained pin will also help.
Fasten the thread and slide the needle along inside the folded edge for 5 mm ( 1/4″ ). Adapt the stitch length to suit the fabric: from 3 mm – 10 mm (1/8″ – 3/8″ ) and straight into the fold opposite. Slide along for 5 mm ( 1/4″ ) and back into the first fold again directly opposite.
If using this stitch for tacking, the stitches can be longer – 1.5 – 2.0 cm (5/8 – ¾” ). Stitch along the tacking line and pull any visible tacking threads out.
Long stitch
Long stitch is the most effective stitch for interlined curtains to hold the interlining tight to the main fabric on the side turnings. It is also used to join lengths of materials together, most particularly the separate lengths of interlining to each other in line with and above the curtain seam lines whilst on the worktable. A short version is used to hold fabric to a lampshade frame.
Fasten the thread inside and bring the needle up approx. 1 cm (3/8″ ) from the raw edge. Take it diagonally to approx. 5 cm (2″ ) further on and make a 5mm ( 1/4″ ) horizontal stitch approx. 5 mm (1/4″ ) from the edge. It doesn’t take long to get a rhythm going and to pitch the length of stitch to suit the situation. To increase the security, make a back stitch into the horizontal stitch at regular intervals – about every 30 cm (12″ ) for curtain edges.
Lock stitch
Lock stitch holds the separate layers of top fabric, interlining and lining together (called locking in), well enough to prevent them from separating whilst allowing some degree of movement. Always use thread to blend with the background of the curtain fabric when stitching the interlining to the fabric, and with the lining colour when stitching lining to interlining.
Fold the lining back onto itself along the marked line. Secure the thread to the lining and make a small stitch in the main fabric just below. Make a large loop approx 10 cm ( 4″ ) long and make a small stitch in the lining inside this loop. Stitch into the main fabric and continue. Slip a finger behind the stitches as you make them to ensure they are neither too tight nor too loose – the fabrics must not be held too tightly too each other as the natural movement of damp and heat will cause ruckles in the layers that will be visible from the front and will affect the hang of the curtains. Allow the long loops also to remain slightly loose.
Tip ! If you’ve made an error here and pulled too tightly for your materials so that ruckles appear on the front of the curtain, just snip the visible stitch from the front with a tiny pair of scissors and carefully separate the layers – it won’t be a disaster and we all learn from mistakes.
Over-sewing
Used to neaten raw edges by hand before machines were in common use, now used in the less accessible areas where over-sewing can be extremely important for longevity.
Secure the thread on the wrong side. Bring the needle through the work approx. 3 mm (1/8″ ) from the edge. Working from left to right, take the needle diagonally over the edge to seal it. Repeat with stitches approx. 3 mm (1/8″ ) deep and 3 – 6 mm (1/8 – ¼” ) apart. A soft fabric will automatically fold over at the edge as you stitch it, which is fine for an internal seam but if it is to be pressed flat, then this needs some control or a paper backing to keep it flat while you are stitching.
Running stitch
A simple in and out stitch of even length, used on the surface for simple decoration – called top stitching – with an interesting thread, or as a double row for hand gathering.
Slip stitch
For holding a folded edge to a flat fabric and the one we use for almost all hemming as it is virtually invisible from the front and from the back too. Especially useful for sheer fabrics and all unlined curtains, and where the folded edge is to the right side of the fabric as a raised border.
Fasten the thread inside the fold and bring the needle out through the fold line. Pick up one or two threads of the flat fabric close to the fold line and return the needle back into the fold as closely as possible to the exit point. Slide the needle along the fold line and bring it out for approx. 5 mm ( 1/4″ ) further along. Pull the threads through to make the stitch. Pick up from the flat material and slide through the fold and out again as a smooth movement. Adjust the stitch length to the material (longer for an open or very see-through weave) whilst picking up the minimum amount of the main fabric. Keep the stitches even.
Tacking stitch
Temporary stitches to hold fabrics in position pending final sewing. They are not reliable enough without the support of either marking tacks or pins or both. Use a contrast coloured thread so that they can be seen easily to pull them out after machine stitching.
For loose covers, use different colours for different areas to avoid confusion.
Take a larger needle and a long length of thread, doubled. Knot the end and make long running stitches. For fabrics that are inclined to move, an occasional back stitch helps to secure the layers, especially at a crucial point. To remove the tacking stitches at the end, cut the knot and pull. Use the quick-unpick to help if they have been stitched in with the seam line.
Trace tacking
Tacking to provide a line to follow. Using a single thread, mark out the line with long stitches and short gaps in between, making an occasional backstitch to hold the line steady. The idea is that this line can be followed and then pulled out easily, so the number of backstitches used is a balance between ease of working and ease of removing.
Tailor tacks
Used to transfer marks from a paper pattern to two layers of the main fabric in one go. Also used in a simplified version to make marking tacks ( coloured tacks ) particularly in loose covers and anything that has to be re-fitted after working – these same tacks are worked into a single layer of cloth, within or at the edge of a cloth, and make secure markers. Using contrasting threads for different areas, or to highlight particular joining points in a row or melée of tacks, makes these markers easy to see, identify and to match up later when you have an apparently impenetrable jigsaw in front of you.
Take double thread in a contrasting colour to the fabric and make a small stitch in the fabric leaving the end of the thread about 5 – 7 cm ( 2 – 3″ ) long. Then make another stitch in the same place, leaving the thread, as you pull it through, in a loop as long as the first thread. Cut the thread off 5 – 7 cm ( 2 – 3″ ) away from the cloth. If this is a single layer, the mark is made. If there is a pattern, ease it way, and if there are multiple layers of fabric ease them apart, then cut through the tack leaving enough thread with each layer that it doesn’t pull away too easily.
Top stitching
Top stitching by hand looks very professional if the stitches are evenly sized and evenly spaced, such as stitching the folds of a welted or flat fell seam from the front.
Prick stitch is used for inserting hand-sewn zips and at the edge of plackets.
It is worked in the same was way as back stitch but leaving gaps between the stitches. For each stitch insert the needle just to the right of where it came out making a small stitch and bringing the needle up about 6 mm ( 1/4″ ) in front.
1 illustration
Stab stitch – or this variation of it – is best used where both sides of the work will be visible, on a medium to heavyweight fabric. Bring the needle up from the underside. Send it down again just a short distance away. Push the needle back into the underside to make a small stitch that mirrors the one created on the top and then just enough to thread it diagonally between the layers to come out at the top approx 6 mm (1/4″ ) from the last top stitch.
1 illustration
Whip stitch
A small stitch used to join two fabrics together – often seen where antique lengths of hand-woven wools and linens have been joined. Neater than a flat or French seam for sheer curtains if you have the patience or the time. Also can be used to apply passementerie to fabric.
Pin the fabrics with the right sides together and the raw edges lined up evenly. Working from right to left, take the needle diagonally over and back with stitches as close to the size of the fabric thread as possible, and around 1 mm (1/16″) each. Match the thread type to the fabric as far as possible.
Tape loops
These are to hold a tea towel or towel to a hook, to fit a cover to an inner, to use as hangers for drying, to hold loose covers around legs etc. In most cases they are fitted to corners, but for towels they might as easily be fitted in the centre of one side.
Fold the tape in half, then :
a) lie the ends of the tape side by side, fold one over the other and hem them together around three sides: turn the tape the other way around and join the two edges of the tape together in the middle with cross stitches: stitch in place.
b) overlap the ends leaving the width of the tape, fold the free end back over and stitch them together around four sides. Turn the loop out and stitch to the project.
c) stitch the ends securely into seams.
d) Pin the two raw edges together and machine across them two or three times. Slip this loop between the hem fold and secure with top stitching.
Trimmings
Applied trimmings should always be chosen carefully so that they really do add something extra. It can be fun and exciting to chose trimmings that provide a hefty contrast and sometimes this really works but at other times, and in general, strong contrasts can become tiresome after a while.
It’s very often better to choose something that relates to one or more tones of the main fabric that effectively provides an extension – an extra tension or texture – to the main textile. The trimming becomes part of, another element of the whole, rather than a strong factor demanding attention.
The most elaborate trimmings that also stand the test of time are almost always closely related in tone to the textile that they adorn. They can raise the game and the calibre of the piece. They can add gravitas or humour. They delight.
Cords
Cording is perhaps the most often used – to cover the raw edges of upholstery, the ends of bolsters, the edges of boxed and scatter cushions, and as an alternative to fabric piping. Flanged cord is set into the seam in much the same manner as fabric piping. Cord on its’ own needs to be stitched to the fabric by hand, and is the last thing to do once the project is finished.
Ropes
As large cords these tend to be chosen for specific purpose and often made to order for stair ropes, perhaps to finish a stool or ottoman, or as wall coverings filets.
Flat Trimmings
Flat braid or ribbon may have very different effects but are all stitched the same way. These are usually chosen or designed to form an essential part of the design of the fabric – instead of print or weave, pattern is created by applied strips. In which case they are applied to the fabric after the cutting out, but before making up. The design can be formal or informal, ranging from a simple but perfectly executed ( it has to be ) Greek key pattern to multiple and random rows of frayed fabric strips. Applied braids and ribbons can really fulfill every need. Just a very fine strip of colour can change the atmosphere and tension of a piece, more complex designs might require serried ranks of ordered tones, another varied widths of clashing, vibrant colour.
Flat woven braids come in many materials, types, designs, widths, shapes and depths, the purpose to add something of definition, but also and most importantly, of luxury.
Flat braids always needs to be pinned accurately – over stretching cause ruckles in the main fabric and under stretching ruckles in the trimming. Weather and climate do affect, so it’s always wise to unravel it for a few days before using it, then to pin it on and leave it at least over night.
Unless you want a butterfly effect, both sides always need to be stitched down. Machine stitching is always neat especially when it’s very tight to the edges, and with enough tacking and pinning easy enough to control. Hand stitching can look as good and sometimes better. Unless the stitches are very tiny and close together it probably won’t lie quite as flat, but unless the braid is smooth that won’t matter. It can look very professional to see neat rows of stab stitching either side of a petersham , say or any tightly woven ribbon or braid. Loosely woven braids can be hand stitched so that the stitching is invisible and this can work very well on large items such as curtain lengths and also cushion fronts. With hand stitching the fabrics are easier to control and with a better result when it’s been possible to feel the tension and adjust the stitching accordingly.
When flat braids are employed as an alternative to piping they are stitched into the seam in the same manner.
Fan Edging
A really simple, lace – like edging that does come in and out of fashion, but seems to keep it’s place happily in traditional country houses. The edging can be scalloped on one or both sides. When the top side is straight it looks best sewn into the seam, when shaped, it looks good outside, set on. The stitching can be virtually invisible, with exactly matching thread and small stitches into the loops.
The small white and off white edgings look very like lace or a picot edging when they’re in situ , which can be very pretty, light and elegant.
Cut Fringe
Fringing can be short, long, heavy, light, single coloured or multic-coloured, in linen, wool, silk, cotton a mixture of one or more, or an artificial thread. It can be plain or shaped, with bobbles and tassels or without etc… – the many designs mean that there is always one fore every purpose.
Bed valances and chair skirts, window seats, cushions, curtains and bed drapes can all be fringed to great effect. Fringing the lower edge of pelmets softens the line and filters the light whilst adding valuable weight – they especially help swags and tails to retain a good shape. Fringed cushions are made both smarter and less formal, he extra weight and form of fringe also helps cushions to stay where they should be, especially if the material beneath is slightly slippery like leather or with a sheen such as silk. Fringed curtains drape beautifully and even the simplest fabric become sumptuous. and important.
Interesting materials and combinations of glass, Perspex, feather, hessian, leather, plastic and wood fit fringings to every sort of contemporary decoration.
Bullion Fringe
Bullion fringe is twisted into loops, a heavier alternative to cut fringe that is especially suited to the skirts of sofas and armchairs, to curtains to add weight.
Rouching
Rouching is almost exclusively used for cushions – it’s essentially a short cut fringe that is so tightly packed with fibres that it creates a lovely furry edge.
Tie backs
As anything that holds a curtain back for reasons of practicality or decoration a tie back can be anything from a simple metal bar or cord loop to a highly ornamented tassels. Anything goes – formal, informal, thick, thin, long, short, glass, leather, soft fibres, metals, metal threads, grasses…..
The position of the tie back and it’s length determine the shape of the curtain that is draped back into it, and the decision for tie backs opr not is largely personal preference.
Where curtains are chosen for decorative purposes only – either shutters or under- curtains used to block out the light – they almost always look better tied back in some manner. These tiebacks are important as they determine the shape of the draped curtain, whether or not they have any independent decorative merit.
Curtains that are used, opened and closed on a daily basis tie backs can look good with tie backs, however because the curtains tend to show crease marks where the tie backs have held them, are often avoided.
Tie backs whose primary function is to keep the curtains out of the way – say close by a door or open window – can be very simple- just enough to hold the leading edge back, and are often metal stems or loops in material to match the poles.
Refurbishment and Recycling
All passementerie plays a vital role in restoration and refurbishment. Not only for historical accuracy but on the much more down to earth level of recycling. In all it’s incarnations – as braiding and fringing, tassels and cording trimmings are as useful for covering mistakes, extending and lengthening, repairing and patching as for decorative ambition.
Bullion can replace a damaged or stained chair skirt, lengthen a pelmet or curtains, cover a seam and refresh a lampshade. Braids too can cover stains, tears, water damage, torn edgings and lengthened hems – all without the work looking poor or bodged. Good quality fabric that has been designed and woven or printed well never really dates – it’s beyond fashion, and when one person tires of it, it soon finds another home. In this time of checking waste, perhaps all types of trimmings will find a refreshed and more imaginative role.
The working position
Sitting or standing well when you are either cutting out and making is likely to make a difference to how you work, and even your attitude to it. Try to avoid stooping over your work, holding it low on your lap or lifting it up too close to your face – neither of these does you or the work any favours; your neck and back will hurt and you’ll get fed up with it too easily, especially when it gets a bit tricky.
Work methodically, and along the worktable with the materials as flat as they can be, just lifting the bit you’re actually working on, and then only if you need to.
For small works and embroidery, plan to have a chair and table that suit you well – we’re all so different that there are no hard and fast dimensions, but ergonomic principles apply, and you’ll enjoy the project much more if you’re comfortable. Use cushions on the chair or the table to lift either you or the work to a point that is most comfortable.
Workroom materials
All of these materials support the creation, the making up, of your main fabric into the design chosen, and as such should be of the highest quality. Whether you are working for yourself or professionally, the time and expertise involved in hand making warrants the best materials throughout. The maxim is integrity: that the inner should be as good as, and equal to, the outer.
1. Interlinings – cotton
Heavy weight cotton interlining – bleached and unbleached
Fix interlining between the curtain and the lining to improve the hang of the curtains and for insulation. To join lengths together, a flat seam is too bulky and they should be joined by hand as you make the curtains up.
Use bleached interlinings with light coloured plain fabrics or patterns on a light ground.
The heaviest, bump, is like a fleecy blanket and is as effective. It is the best for overlong curtains in rural houses and will see off the most persistent draughts, especially when the curtains are resting fully on the floor.
Use the medium weight interlining for light to medium weight curtain fabrics, where the heaviest would drag the fabrics (for example, most silks and fine cotton) and where you want the curtains to retain a lightness of feel and to move more freely.
.
2. Interlining – domette – bleached and unbleached
Very fine interlining used for lightweight curtains where the addition of interlining is beneficial for small windows, to improve the hang or suffuse draught; and for soft pelmets.
3. Interlining – sarille
A less expensive option that is much lighter weight, especially useful for a project on a budget as the lighter weight and easier-to-manage product, can cut the making time by half.
4. Interfacings
A selection of types and weights of material used to stiffen sections of some soft furnishings between two layers to achieve a particular look or shape.
Non-woven interfacings are made of fibres fused together with a binding agent. They can be cut in any direction and are pliable. They are available in several weights to sew in or iron on.
Woven interfacings such as linen canvas, buckram, scrim and Holland should be cut with the grain. They are usually sewn in but can come with a fusible backing.
Iron-on
To iron on, trim away the seam allowances and place the interfacing in position with the fusible side down. Press directly onto the material with a dry iron on a warm setting, without sliding the iron, which could partially dislodge the facing to cause ruckles.
Sew-in
Light to medium weight interfacings are stitched to the main fabric first, then made up as one. Stitch the interfacings in place as shown in the appropriate project, then trim the interfacing seams back to 4-5 mm/3/16”.
For heavier weight interfacings: chalk the seam allowances on the main fabric, cut away the seam allowance on the interfacing and place within the chalk lines. Herringbone stitch the interfacing to the main fabric along the chalked lines and stitch the body of the interfacing in place, if necessary, as shown in the particular project.
5. Black-out lining
This is a lining fabric that prevents most light penetration. It’s light on the back and silver on the black-out side, which goes against the fabric. It will make any light coloured curtains look darker unless used with an interlining. We would use it with and not instead of the other linings and interlinings and almost always with interlining.
6. Platform lining – black twill
Use for the undersides of chair seats, the back of bedheads and as a black-out lining beneath the usual lining.
7. Curtain lining – cream and white
Curtain linings protect the fabric from sunlight and dirt and improve the hang of standard curtains. Choose only the best cotton sateen that is densely woven, has a good weight and has been treated to resist damage by moth and by sunlight (solprufed).
If I am making my own curtains, I want it to feel good when I use them and to know they will last as long as possible. The difference in cost is a small percentage of the overall project.
8. Calico – light, medium and heavy weight
Use to make pattern toiles; to line the undersides of chairs and backs of bedheads; to line and block out a darker colour of an existing chair or behead; as the first or under cover for a stool, seat, chair or bedhead. Use washed to make inexpensive curtains and covers.
9. Cotton duck
Cotton canvas in various weights that can be used for a variety of purposes including: as an alternative to black platform, where the black will look wrong – perhaps to line the back of a tapestry or bedhead; to make a stiff toile or template; for inexpensive curtains and covers; as a separate lining beneath a loose cover to diminish the effect of the upholstery beneath (where light ground is over dark).
10. Hessian and scrim
Jute based materials for upholstery linings to cover works – and for sheer curtains. Scrim for cleaning. Available in a variety of weights and weaves from tightly woven sacking to open scrim – for purpose.
11. Muslin
For toiles, for patterns and templates, and for backing quilting, patchworks and Italian quilting. Available from a the finest woven sheer of high quality, to butter muslin, to an open weave cheesecloth, bleached, unbleached and fire retardant. Although more expensive, we keep a roll of the best quality in stock so that we can also use if for sheers and cushions as we need to.
12. Polyester wadding/ batting
Standard weights are – 50g/2 oz; 100g/4 oz; 150g/6 oz; 200g/8 oz
The lightest weight is used for appliqué as it almost disappears under pressure. The medium weights are for quilting and to pad bedheads and seat cushions, to soften a hard foam beneath. The heaviest weight is used for re-upholstery and for quilted curtains. It comes in two widths, 67 cm ( 27″ ) and 135cm (54″). If you need to join two pieces, open up the edges of both pieces and overlap them together in layers. Pin and stitch together with long stitch or herringbone stitch.
13. Cotton wadding/ batting
As an option to polyester wadding, cotton, or flock wadding, it is denser and much more difficult to use but much more sympathetic for traditional upholstery.
14. Wool wadding / batting
Our preferred option to polyester wadding, it’s more expensive but so much nicer to use than polyester. The only option for something that is made to last, that will be close to your skin, or for the eco- minded. Wool is the perfect material.
15. Cushion pads
Stock standard sizes for square pads are: 30cm (12″ ); 35 cm ( 14″ ); 40 cm ( 16″ ); 45 cm ( 18″ ); 50 cm ( 20″ ); 55 cm ( 22″ ); 60 cm ( 24″ ) and then rectangular: 40 x 50 cm ( 16 x 20″ )and circular : 40 ( 16″ ); 45 cm ( 18″ ) – or whatever sizes are currently fashionable. These can be used as they are or adapted to suit your particular purpose. As with all materials buy the best you can afford – the highest percentage of down to feather make the best scatter cushions. Silk, fibre, kapok or wool inners are non allergenic.
16. Herringbone tape
Standard sizes are: 25 mm( 1″ ); 50 mm( 2″ ) ; 75 mm ( 3″ ); unbleached.
Used to stiffen a heading where buckram is just too rigid: for flat curtains; all hand gathered, pleated and smocked headings; also for informal cushion and heading ties.
17. India tape
Standard sizes are: 12 mm ( 1/2″ )bleached, unbleached and black
A soft, woven tape to use as seam bindings but for purposes mostly for ties: to hold the undersides of loose covers to chairs, to tie the covers for bedheads, sofas, stools, seat squabs, bed valances etc. to wood or metal frames, where they are out of sight.
18. Heading tapes
Standard sizes : 20 mm( 3/4″ ) ; 35 mm (1 3/8″ ) ; gathering, 60 – 90 mm ( 2½” – 3½” ) for pencil pleats.
Machine or hand stitch to the back of the curtain head and pull up to make pre-formed gathers or pencil pleats.
19. Buckram
Standard roll size: 100m x 10 cm – 15 cm ( 4″ – 6″ ).
Use to stiffen headings before hand pleating (blocking) headings. It can be easily trimmed to size or joined together, so there is no need to stock any other sizes.
20. Blind cord
Use a good quality, non-stretchy cord. To fold up all blinds and for pulling through tiny rouleaux.
21. Piping cords
Standard sizes are: No. 4 and No. 6 – unbleached cotton
4 mm and 6 mm ( approx. 1/8″ – 1/4″ ) diameter pre-shrunk workroom quality for general use on cushions and loose covers.
22. Piping cords
Special sizes: No. 1 – No. 8 – cotton
We keep just one box each of these special sizes for more intricate work and to give us maximum flexibility with whatever weight of fabric we are working with. These might be a little coarser than the standard workroom cord, fine fabrics will need to be lined.
23. Chain weight
In light, medium and heavy
To weight the hems of curtains, pelmets, valances: wherever the addition of weight will improve the hang and stability of the project. Use draped chain weight to set the shape and form the template for swagged pelmets.
24. Penny weights
To weight the corners and seams of curtains: these need to be sewn into small lining bags, before using.
25. Threads
Always match like for like. Cotton thread with cotton fabric, silk thread to silk fabric, etc. Use
either for wool.
26. Coloured threads
For tacking lines and tailor tacks and especially for the marking tacks in loose covers that need to be matched up later.
27. Buttoning thread
Strong cotton thread for securing buttons.
28. Curtain hooks
Two types for hand sewn headings.
29. Curtain hooks – brass and plastic
Use brass hooks for all heading tapes in preference to the plastic options that discolour and perish early as the plastic becomes brittle in sunlight. Use plastic only when a brass will be visible as a dark mark behind a light sheer.
30. Pin hooks
Use to fix hand-pleated headings where hand sewn hooks are not the chosen option. Pin hooks are easily adjustable, so use for the curtain returns or where any heading needs temporary or on-site adjustment.
31. Zipper
Standard stock is a roll of white and beige zipping in light, medium and heavy weight with separate sliders, which is then cut to length for boxed seating cushions. Also keep a selection of coloured zips in standard sizes, 40 – 60 cm ( 16″ – 24″ ) for scatter cushions, or order per project.
32. Popper tape
Use for box cushion and loose cover closures.
33. Hooks and eyes and poppers
Use for invisible closures and to hold armcovers in place – more professional than loose cover pins.
34. Touch-and-close tape
Standard sizes are: – 15 – 20 – 30 mm -( 5/8″ – ¾” – 1¼” ) in beige and white
Use to fix fabric to the underside of solid furniture, blind tops and pelmets to battens and boards. Never as a closure for cushions or loose covers: it is too ugly.
35. Solid brass rings – 12 mm and 20 mm(1/2″ and ¾” )
The smaller rings are used to stitch to the back of blinds, the larger for tiebacks and other closures. Use white plastic ones only for the lightest fabrics as they discolour and perish in direct sunlight.
36. S-hooks
Use to separate cords.
37. China thimbles
To hold cording for traditional blind and curtain fittings.
38. Cord weights – various sizes and styles
To close the end of blind and curtain cords, the size and weight need to be in balance and proportion to the window treatment.
39. Screw eyes and vine eyes
Fix into battens and boards to hold the curtain returns, bind cords, any fixed headings.
40. Turn buttons
In silver and black for fixing fabric to a solid surface: window sheers and any non-operating fabrics, so that they can be removed for cleaning, and for holding settle back cushions in place.
41. Eyelet kits
Useful for tabs and ties, lightweight curtain headings.
42. Tie back hooks
The basic simple brass hooks, plus others to accommodate different styles and sizes of tiebacks. Or order per project. We keep a selection of our preferred ‘standards’ in black, pewter, steel and brass.
43. Loose cover pins
To hold loose covers in place, especially armcovers.
Workroom tools and equipment
If possible try to reserve a ‘workroom’ at least for the period of your life when you’re making furnishings. Curtains especially should be moved as little as possible during making and it’s not always easy to find the time to complete a project in one go. See separate BASIC TECHNIQUES sheet for temporary table and ‘room’ suggestions.
1. Sewing machine
All furnishings can be made by hand, and much is, but for ease you will need a sturdy, basic sewing machine with forward and reverse stitches; a swing needle may be useful but is not necessary. The three feet you will need are: normal stitching foot; piping foot; zipper foot.
2. Overlocker
For professional making, an overlocker is very fast and is the easiest method for finishing the seams inside cushions and loose covers.
3. Worktable
A good solid work surface large enough to hold a whole width of fabric makes the job a lot easier. For just a few projects an even floor surface is good enough. The table needs to be set up with the furnishings work on it so that you don’t have to keep moving it. Unless you have a spare room, a large eating table, or can cover the top of a snooker table, a board on legs fitted over a spare bed can be a good temporary solution.
4. Iron
Buy the heaviest domestic iron possible. If you have a steam iron, keep it filled with water to maximize the weight. Otherwise a hand spray and damp cloths are as good and as easy to use. The best way to iron furnishings is at a high temperature and quickly. Invest in a professional iron if you have a lot of making to do.
A direct steam iron is a pretty essential investment for anyone planning to make a lot of furnishings
5. Long Ruler
A metre rule or yardstick is needed for measuring fabric and accurate lengths. Also useful for sweeping across fabric on the worktable to smooth out ruckles.
6. Gauge
A small, 16 – 18 cm (6 – 8″ ) ruler with a marker that can be set to ensure accurate turnings.
7. Tape measure
This should be made of linen or glass fibre or other non-stretching fabric, for measuring around anything with form – loose covers and upholstery, lampshades.
8. Set square
At least 60 x 30 cm (24″ x 12″ ). Use for squaring fabric, essential for Roman blinds.
9. Scissors
Don’t let them be sued for cutting paper, polythene or anything else…
1. For cutting, use heavy scissors with an 20 – 23 cm ( 8 – 9″ ) blade.
2. For snipping, have a small pair with 7- 10 cm ( 3 – 4″ ) blades.
3. Pinking shears are useful for attractive edgings and to prevent fraying.
10. Quick-unpick
For mistakes!!
11. Point turner
Buy a bone one if you can as they have softer points – useful for pushing fabric into tight corners and enforcing creases, especially when making detailed shapes.
12. Pins
Fine steel 35 mm( 1 1/2″ ) medium weight, for general use. Use heavy 50 mm (2″ ) pins for loose covers and heavy fabrics.
13. Skewers
Use upholstery skewers to hold heavy fabrics in place and to hold drapery in place while cutting.
14. Needles
Available in many sizes: use ‘Sharps’ for medium to fine fabric: ‘Betweens’ for medium to heavy
fabrics. In my experience every person has their favourites, pretty much regardless of the type of work.
15. Pin cushion
A large pin cushion to have on the table and a small wrist pin cushion to use at the machine and away from the table.
16. Thimble
Essential to protect fingers when working with several layers of fabric and very heavy fabrics.
Steel thimbles are the most durable, they need to be lightweight, and to fit comfortably. The bone ones you can find on the antiques stalls are liable to break, silver ones are soft and will dent easily. Having said that I like my silver thimble, I don’t need to use it very often and the surface pitting just shows me that it’s been used and loved.
17. Curtain clips
Use large bulldog clips or special curtain clips to hold the fabrics to the table, to prevent the fabrics moving until stitched.
18. Marking pen
Use a marking pen that will not leave any marks on the fabric when the pen marks are rubbed off.
19. Tailor’s chalk
Use to mark fabric from the right side, as it just brushes off.
20. Marking paper
For pattern transfer – a supply of heavy paper, smocking paper, stencil card.
21. Buttoning needle
Long needle with a large eye for buttoning cushions and upholstery.
22. Stapler
Buy a heavy weight stapler that will take 6 mm (1/4″ ) and 10 mm ( 3/8″ ) staples. Use for fixing
touch-and-close tape to pelmet boards and for upholstered headboards.
23. Safety Pins
Child proof nappy pins for a variety of uses, and a pack of mixed sizes.
24. Thumb tacks
The biggest ‘drawing pins’, to hold fabric into wood – toiles for pelmets, blinds, curtains and to
fix the tops of blind and pelmets.
25. Combs and brushes
To finish off the work, remove stray threads, a small baby brush is especially useful to use on finishes works and even the most delicate fabrics. Combs to brush out fringings once the
protective threads have been released.
26. Chamois leather
To brush, polish, clear up spills.
27. Tack cloth
To wipe down any surfaces after sawing or other dust.
28. PVA glue
A non-yellowing easy to use adhesive for all gimps and edgings where hand stitching is impossible or out of sight.
29. Spray glue
Use to hold foam to wood, especially for bedheads, or the first layer of lining or paper to a solid screen.
30. Silicone spray
To ease and allow free movement over poles and tracks.
31. Brushes
For glue and touching in paint.
32. Tacks – upholstery, carpet and coloured gimp pins
For securing material into wood: essentially upholstery materials and for the sides and tops of pelmets and blinds.
33. Tenon saw
For cutting blind battens and rods.
34. Hot glue gun
For tricky work and fixing corded edges to walls.
35. Staple removers and pliers
To remove tacks and staples, and old upholstery fabrics.
36. A selection of : screw drivers and screws, allen keys
Just because they come in useful.
37. Jute string
The softest you can find, because it comes in useful.
38. Black cellulose paint
To touch in any steel screws that are fitted by your fitter into black poles and fittings.
39. Set square with spirit level
To check and to mark the small fittings positions.
40. Retractable steel ruler
For measuring windows.
Zippers
As a neat and efficient, easily accessible, virtually invisible closure the zip, or zipper, has no equal. For many purposes it’s by far the best and most obvious solution – so it’s worth learning how to fit a neat one! Zippers are almost always fitted for convenience and economy rather than looks, the only exceptions when the size, colour or detail has been chosen for a design detailing reason.
So, here is everything to do with zips:
* If you have zipper phobia and can’t be converted, use a popper tape, studs, lacing, or ties – anything other than touch and close tape, which can never look anything but bulky and ugly.
* The colour of the zip should be as close to the ground colour of the fabric as possible, unless a contrast is part of the design.
* Always choose thread in a close toning colour unless the zipper is part of the design – to be seen, in which choose a decorative thread colour
* Most zippers in the workroom are used for boxed cushions, followed closely by scatter cushioning. These require simple, heavy duty closures. For the boxed cushions the zip is fitted within a gusset at the back of a cushion, which itself sits within the back and the sides of a chair. – i.e. not on view. Zippers are the quickest and easiest way to open and close covers that need to be removed for laundering, and are strong enough to take the strain of a full pad and machine washing.
The Guidelines:
* The basic rule is: zippers are not a lovely substitute for a closure that is on show – but certainly a far better option than any touch and close tape.
* Always hand-stitch; it looks unbelievably better and is almost always easier to do.
* Choose the zipper to be the right weight and material for your project – light, medium or heavy weight, in nylon, metal, rustproof or waterproof.
* Check it’s pre-shrunk – especially if you’ll be using it for white cushions and slip covers; wash fabrics and zipper separately at the highest temperature you’re likely to need.
* Choose the right colour of zipper – generally matching the ground cloth
* Choose thread that matches as closely with the ground cloth as possible, rather than the zipper if there is a difference. Unless for decorative finish with stitching that should, by design, be seen.
* Allow a minimum of 3 cm ( 1 1/4″ ) seam allowance for each side of the zipper seam.
* Press the fabric well before you start to insert the zipper.
* Should the seam be on the cross, first stabilise it with stay stitching just within the seamline.interface if necessary
* To stabilise fabrics with any degree of stretch in them, first underline the seam with seam binding – tuck the straight edge right into the fold of the seam, and stitch to hold it in place just within the seam line.
* To protect and disguise a zipper, particularly for outdoor use, design and make a flap that covers over the zipper and is itself fixed with studs or hooks and bars.
* Always set an ‘invisible’ zip into a seam; stitch the ends of the seam first, leaving a gap for the zipper; with any pattern fully matched. Just remember that if the cushion is reversible, the top and bottom of the gusset will probably show a little and the pattern therefore needs to follow through, especially with a geometric pattern.
To fit the zipper:
* Whether by hand or machine, when stitching the zipper into place open it slightly so that the pull is out of the way and the zipper partly open; when it gets in the way, leave the needle in the work and pull the zipper closed.
1. Always pin the zipper in place from the head, downwards.
2. With the zipper closed, position it beneath the underside seam so that the folded edge is as close to the teeth as possible. Pin it in place and stitch.
 2.1 If machining use a piping or zipper foot, to get the stitching line as close to the teeth as possible.
2.2 For hand sewing, use a running, stab stitch or prick stitch (a tiny, even back stitch) just 2-3 mm( 1/8″ ) from the folded edge.
 3. Fold the overlap side over and pin it in place, so that the folded just covers the first stitching line. Place some pins across the zip to prevent slippage.
4. Stitch from the head, with the zipper slightly open and the pull out of the way. Keep the stitching line parallel to the folded edge, and after about 10 cm( 4″ ) of stitching, close the zip pull to take it back to the top of the zipper.
 5. Stitch across the closed end or ends to reinforce the ends, either a) invisibly: working from the back, make 3-4 long and secure re-inforcing stitches across the seam just below the end and above the opening or b) visibly: for decorative reinforcing stitches at one or both ends, work from the front, stitch an arrow or squared shape with buttonhole thread.
6. Remember to leave the zip open a short way – 5-6 cm ( 2-3″ ) so that you can easily open the zipper fully, even from the inside, before the work is turned right side out.
7. Press, over a dry cloth – embedding any surface stitches and avoiding any ridged or indented edge along the seamline.
Finishing the top of an open zipper:
* When the closure is open ended at the top of the zipper (as it would be at the bottom of a loose cover) make a tiny hook and bar to hold the open fabrics together, this both conceals the top of the zipper and prevents the fabrics flapping open.
* Always close the zipper fully and secure the top hook and bar for laundry and dry cleaning.
Pressing :
* Never press the teeth of a nylon zipper, especially a lightweight one – you could easily take off the coating that allows the zipper to slide easily, or distort the teeth.
* Press only if needed, over a dry cloth – embedding any surface stitches and avoiding any ridged or indented edge along the seamline.
Lining the back of the zip:
If the zipper is used for decorative purposes on a top layer, fit a narrow length of the same fabric – a pressed tube, or a seam binding the width of the zipper tape – and 4 cm ( 1 3/4″ ) longer behind the teeth. Pin it in place, then stitch along the length, trim, press and finish the seam. Stitch across the end at the bottom – it’s not going to move anywhere, so the top end can usually be left, but you might want to catch it down with a slipstitch or a clear press stud.
Invisible zippers:
Use this when a zipper is the best solution to keep a closure as flat, as minimal and as close to the form as possible – when an opening is essential but you don’t want any extraneous detail.
It is worked from the front of the fabric before it’s seamed and any facings are attached.
- Finger fold the seam-line, to make a slight imprint, a line to follow.
- Open the zipper out and place it face down on the right side of the fabric, with the tape within the seam allowance and the teeth along the seam-line.
- By hand, with piping foot or a zipper foot, stitch the zipper in place, as close to the teeth as possible.
- Close the zipper, and pin the fabric along the other side: open up, then stitch close to the teeth.
- To join the seam below it: pin, then start stitching the seam a short distance from the end of the zip, go back and hand-stitch the last piece of the seam, perhaps from the front, but so that it looks flat and neat.
- If the top is also enclosed into a seam, first close the end of the zipper with a bar of hand-stitches across the back of the teeth, then make the seam as above.
- You may want to neaten the seam and the zipper tape: to do so, trim and over-sew, or make a row of neat running stitches to hold the layers together as one.
……………………………..
ZIPPER: to conceal or to decorate ?
Zippers are almost always strictly functional, placed where they are the least visible, but there are exceptions, specifically designed to show where the feature pulls, the colours, teeth or sides really matter.
The places where zippers are needed for both strength and efficiency are usually a) within the gusset of a box cushion, perhaps b) the length of a bolster or long cushion or bolster, and c) to close loose covers – either within a seam within the back or joining side to back. Mostly these are virtually invisible – the back of a box cushion gusset is usually out of sight, against the back of a chair or sofa or window seat.
However there are times where the zipper can only be in view, so there are two routes to choose between – disguise or definition. For disguise, a covering flap the full width of the cushion gusset is the most successful that we have found, and for definition the aim is to create interest around it: perhaps to set it into a braiding or binding of some sort.
To disguise a zipper: using a separate flap:
For this method a flap made to the exact size (and pattern matched if applicable) of the gusset and the length of the zipper side of the cushion is stitched into the top of the gusset, so that it falls down over the zip and is fixed along the bottom edge, in such a manner that it can be opened easily for cleaning.
- Make up a lined piece of fabric that is, finished, the width of the cushion gusset plus one seam allowance and the length of the zipper side of the cushion.
- Set this piece into the zipper side of the cushion, within the gusset to the top of the cushion seam. It should fall to the bottom of the gusset to cover the zipper fully and at the same time look like one side of the cushion.
- Make an invisible closure along the lower edge using hooks and bars or press studs. Or if the laundering is irregular, choose the neatest finish – slip stitch to close and be prepared to undo and re-do the stitches with each laundering.
To make a feature:
- For this option, select a metal zip in a close or contrasting colour and set it into the seam with the teeth fully showing. Stitch it in place with a statement double row in coloured thread, or apply patterned, woven braiding, or lace all around and mitre the corners at each end.
- Choose a zipper that has either been especially designed to show, or one that has attitude – contrast colour or material and make the stitches show.
To set a zipper into any project as an afterthought:
As afterthought and feature, first mark out and cut an opening in your fabric the length of the zip. With the fabric right side down, mark, by pencil or scoring, one line parallel to each side and 3 mm ( 1/8″ ) from the cut and then 3mm (1/8″) away across top and bottom. At both ends snip into the corners, then press all the sides 3 mm ( 1/8″ ) in. The width of this opening should be equal to the width of the zipper teeth, so if an extra chunky zipper is involved than adjust the sides of the zipper opening to suit.
With the fabric right side up, place the opening over the zipper with the folded edges along the edge of the teeth, then stitch it into place as closely to the teeth as you can, then secure across the top and bottom either by machine or by hand, making the stitching more or less obvious.